How Windows Verifies Driver Signatures

I recently wrote a series of articles exploring the inner workings of Mimikatz and LSASS. During my research, I was intrigued to find that the mimidrv.sys kernel driver could run on Windows 10, which sparked my interest in understanding how code signing works and how it can be verified.
Checking a Signature
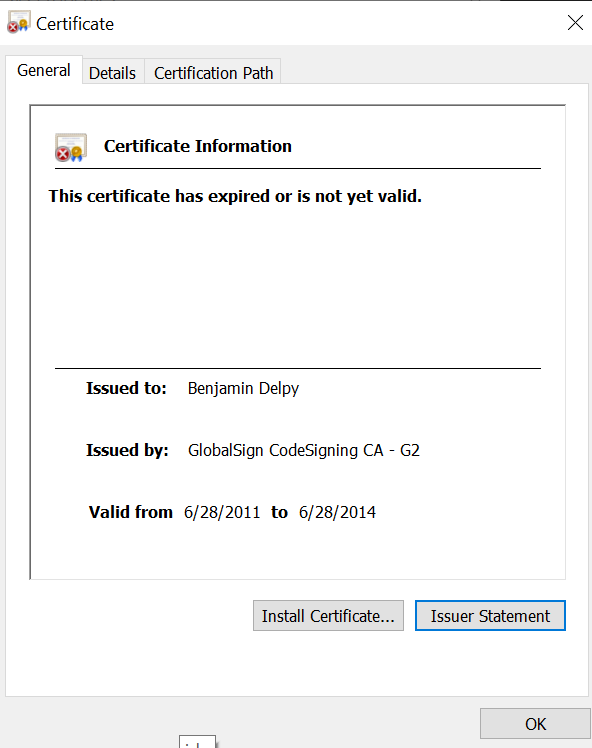
In File Explorer, I right-clicked on mimidrv.sys and selected Properties -> Digital Signature -> Details to view its signature information. It displayed the message, “A required certificate is not within its validity period when verifying against the current system clock or the timestamp in the signed file.” indicating that the certificate used for signing is likely outside its validity period.

When I clicked on View Certificate in that window and checked the certificate details, it displayed the message “This certificate has expired or is not yet valid.”
To check this via the command line, I first ran the PowerShell Get-AuthenticodeSignature cmdlet, which simply returned NotSigned.
> Get-AuthenticodeSignature -FilePath .\mimikatz.exe

    Directory: C:\Users\malware\Desktop\mimikatz

SignerCertificate                         Status                                 Path
-----------------                         ------                                 ----
                                          NotSigned                              mimikatz.exe
On the other hand, sigcheck.exe from Sysinternals provided much more detailed information:
> sigcheck.exe .\mimidrv.sys

Sigcheck v2.90 - File version and signature viewer
Copyright (C) 2004-2022 Mark Russinovich
Sysinternals - www.sysinternals.com

C:\Users\[REDACTED]\Desktop\mimikatz\mimidrv.sys:
        Verified:       A required certificate is not within its validity period when verifying against the current system clock or the timestamp in the signed file.
        Link date:      8:43 AM 9/19/2022
        Publisher:      Benjamin Delpy
        Company:        gentilkiwi (Benjamin DELPY)
        Description:    mimidrv for Windows (mimikatz)
        Product:        mimidrv (mimikatz)
        Prod version:   2.2.0.0
        File version:   2.2.0.0
        MachineType:    64-bit
Verifying the Signature
To verify the signature, use signtool.exe from the Windows SDK, typically located at C:\Program Files (x86)\Windows Kits\10\bin\[version]\x64.
> signtool.exe verify /kp /v .\mimidrv.sys

Verifying: C:\Users\[REDACTED]\Desktop\mimikatz\mimidrv.sys

Signature Index: 0 (Primary Signature)
Hash of file (sha1): 979E0FA74FA1132740F58714D10CC889F0E97510

Signing Certificate Chain:
    Issued to: GlobalSign Root CA
    Issued by: GlobalSign Root CA
    Expires:   Fri Jan 28 05:00:00 2028
    SHA1 hash: B1BC968BD4F49D622AA89A81F2150152A41D829C

        Issued to: GlobalSign CodeSigning CA - G2
        Issued by: GlobalSign Root CA
        Expires:   Mon Apr 13 03:00:00 2026
        SHA1 hash: 8FF0FED99DE06F18EA075E0494DF9A5E5A05CDA5

            Issued to: Benjamin Delpy
            Issued by: GlobalSign CodeSigning CA - G2
            Expires:   Sat Jun 28 02:46:16 2014
            SHA1 hash: AB9E92B943ED47D915BC26939E24A58303ACAA7E

File is not timestamped.

SignTool Error: WinVerifyTrust returned error: 0x800B0101
        A required certificate is not within its validity period when verifying against the current system clock or the timestamp in the signed file.

Number of files successfully Verified: 0
Number of warnings: 0
Number of errors: 1
I suspect that the WinVerifyTrust function is also called internally by sigcheck.
Where the Signature is Embedded
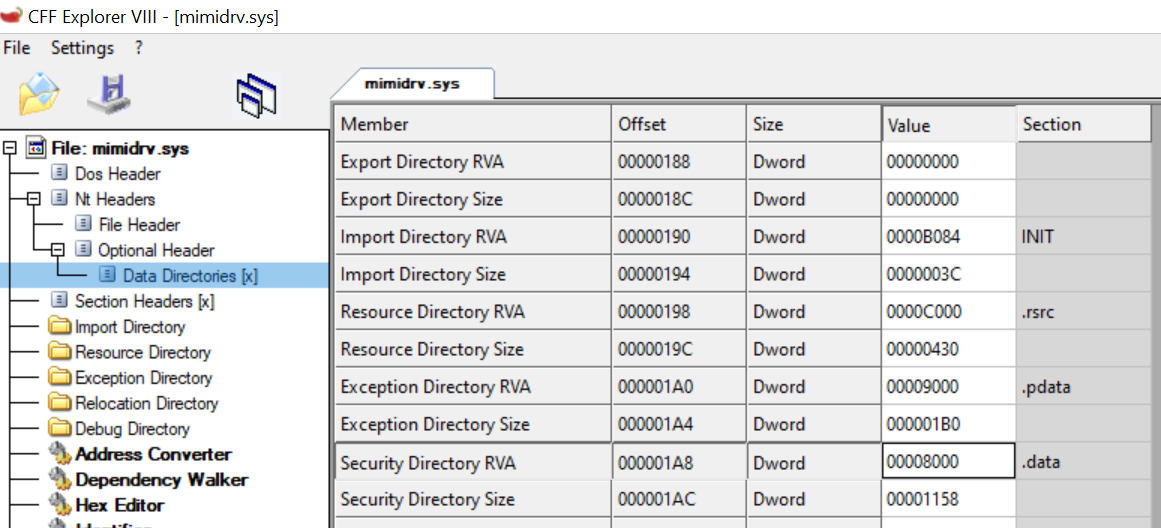
The location where the file signature is embedded is specified in the RVA value of the Security Directory in the Optional Header. For example, when we open mimidrv.sys in CFF Explorer and check this value, we can see that it is at the 0x8000 offset, as shown below.
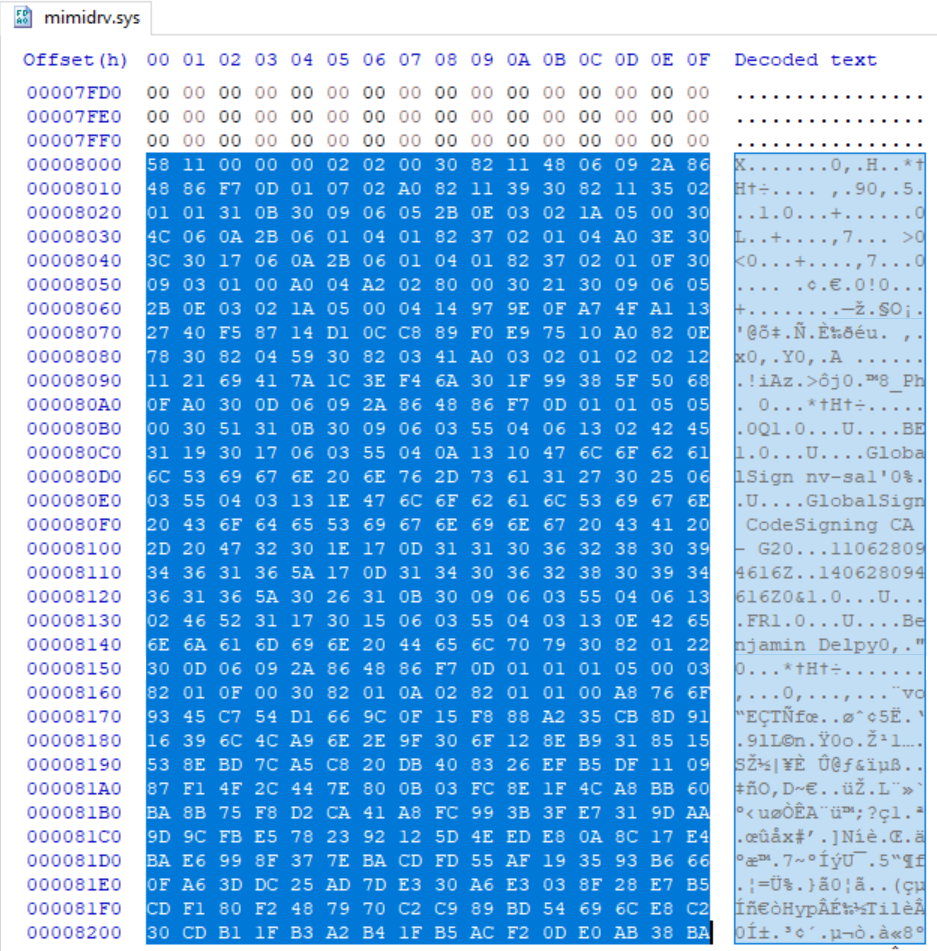
When we examine the file offset location in HxD, we can see that it marks the beginning of the embedded signature, as shown below.
Functions like WinVerifyTrust appear to access this embedded data to perform signature verification.
Code Signing is Hard
As described in this article, signing a driver currently appears to be quite a hassle—it requires an EV Code Signing certificate, verification through the Windows Hardware Developer Center, and a signature from Microsoft.
Running Unsigned Driver
I was curious under what conditions the Windows system would block the execution of a driver that is unsigned or has an untrusted signature, so I decided to run a quick experiment.
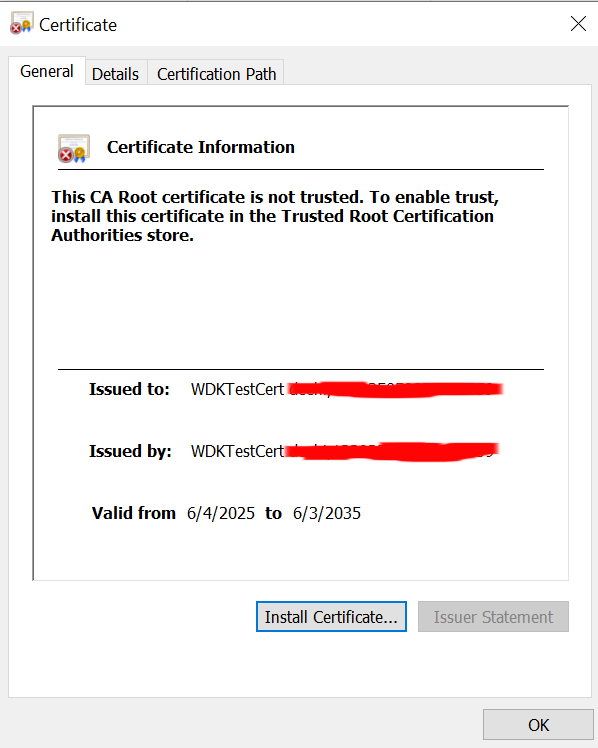
For this, I created a simple kernel-mode driver named mydrv.sys, signed with a WDKTestCert, which is not trusted. This signing is performed by default when developing and building drivers using the Windows Driver Kit (WDK) in Visual Studio. Since this certificate is intended for testing and isn’t trusted, the system should reject the driver at the service startup.
Running without NoIntegrityChecks & Test-Signing
First, I attempted to create and start the driver service without modifying any Windows settings. As a reminder, I executed the following commands and then rebooted the system:
bcdedit /set nointegritychecks off; bcdedit /set testsigning offAfter rebooting, I ran the following commands to attempt starting the kernel driver.
> sc.exe create MyDriver type= kernel binPath= "C:\Users\[REDACTED]\Desktop\mydrv.sys"
[SC] CreateService SUCCESS

> sc.exe start MyDriver
[SC] StartService FAILED 577:

Windows cannot verify the digital signature for this file. A recent hardware or software change might have installed a file that is signed incorrectly or damaged, or that might be malicious software from an unknown source.
As expected, it failed. The error code 577 corresponds to ERROR_INVALID_IMAGE_HASH, indicating that the signature could not be verified. This is the expected behavior.
Running with NoIntegrityChecks & Test-Signing
This time, I modified the boot settings using the following commands:
bcdedit /set nointegritychecks on; bcdedit /set testsigning onThe above settings allow the driver to run even when it is test-signed. After rebooting, I tried to start the driver and confirmed that it loaded successfully.
> sc.exe start MyDriver

SERVICE_NAME: MyDriver
        TYPE               : 1  KERNEL_DRIVER
        STATE              : 4  RUNNING
                                (STOPPABLE, NOT_PAUSABLE, IGNORES_SHUTDOWN)
        WIN32_EXIT_CODE    : 0  (0x0)
        SERVICE_EXIT_CODE  : 0  (0x0)
        CHECKPOINT         : 0x0
        WAIT_HINT          : 0x0
        PID                : 0
        FLAGS              :
How SCM Works
From the above results, it’s clear that kernel drivers with untrusted signatures cannot be started unless both nointegritychecks and testsigning are enabled. In this section, I initially investigated how the sc.exe start command is executed and how it starts or restricts services—so this part is somewhat tangential to the main topic.
Internal Workings of sc start
First, I reverse engineered sc.exe using Ghidra to understand what actions are performed internally after executing the sc start command. I found that the following steps are carried out:
- Calls
OpenSCManagerWto obtain a handle to the Service Control Manager (SCM). - Calls
OpenServiceWto open the specified service (in this case, the kernel driver’s service) with theSC_MANAGER_CONNECT | SC_MANAGER_CREATE_SERVICEaccess rights. - Calls
StartServiceWto start the service. - Calls
QueryServiceStatusExto retrieve the service status. - Outputs the status to the console.
According to the Microsoft documentation:
When a service is started, the Service Control Manager (SCM) spawns the service process, if necessary.
This suggests that sc.exe is only responsible for calling StartServiceW, while the actual processing is handled by the SCM (services.exe).
Additionally, as noted in the documentation, the SCM functions as an RPC server, meaning that StartServiceW internally sends an RPC request to the SCM.
To examine its internal behavior, I began debugging the process in WinDbg (as Administrator!) while running the sc start <my-driver-service> command and set a breakpoint at the entry point of sc.exe.
> bp sc!wmain
> g
After that, I used step-into to proceed carefully until reaching the point where StartServiceW was called, since—for some reason—I wasn’t able to set a breakpoint directly at the StartServiceW call in my environment.
> p
sc!Worker+0x294c:
00007ff6`19ad39ec 48ff157d060100  call    qword ptr [sc!_imp_StartServiceW (00007ff6`19ae4070)] ds:00007ff6`19ae4070={sechost!StartServiceW (00007ffa`ede85500)}

> p
sc!Worker+0x2953:
00007ff6`19ad39f3 0f1f440000      nop     dword ptr [rax+rax]

> r rax
rax=0000000000000000
When I checked the return value (RAX) immediately after calling StartServiceW, it was 0, indicating failure. To retrieve the error code, I repeated the process and inspected the value of RAX immediately after GetLastError was called, as shown below:
> p
sc!Worker+0x295c:
00007ff6`19ad39fc 48ff1575780000  call    qword ptr [sc!_imp_GetLastError (00007ff6`19adb278)] ds:00007ff6`19adb278={KERNELBASE!GetLastError (00007ffa`ecf9cf50)}

> p
sc!Worker+0x2963:
00007ff6`19ad3a03 0f1f440000      nop     dword ptr [rax+rax]

> r rax
rax=0000000000000241
The error code was 0x241, which corresponds to ERROR_INVALID_IMAGE_HASH, indicating that code signature verification had failed.
Internal Workings of StartServiceW
I further analyzed the internal operation of StartServiceW and found that it ultimately calls NdrClientCall2, which triggers an error and sets the return value to 0x241.
Within NdrClientCall2, I found that NdrpClientCall2 was invoked as part of the function’s execution.
It’s likely that data is exchanged with the RPC server within NdrpClientCall2. I observed that NdrpClientUnMarshal is called during this process, and shortly after, the value 0x241 is stored in RAX.
This indicates that the driver signature verification is actually being performed on the RPC server side.
Internal Workings of SCM
Next, I needed to investigate how the Service Control Manager (services.exe) processes the RPC request and verifies the driver signature for the specified service.
To do this, I reverse engineered services.exe.
The settings for the dispatcher that executes on the RPC server side upon receiving a request are defined in the interface passed as the first argument (IfSpec) to RpcServerRegisterIf. According to this post, this structure appears to be RPC_SERVER_INTERFACE, as shown below:
typedef struct _RPC_SERVER_INTERFACE
{
    unsigned int Length;
    RPC_SYNTAX_IDENTIFIER InterfaceId;
    RPC_SYNTAX_IDENTIFIER TransferSyntax;
    PRPC_DISPATCH_TABLE DispatchTable;
    unsigned int RpcProtseqEndpointCount;
    PRPC_PROTSEQ_ENDPOINT RpcProtseqEndpoint;
    RPC_MGR_EPV __RPC_FAR *DefaultManagerEpv;
    void const __RPC_FAR *InterpreterInfo;
    unsigned int Flags;
} RPC_SERVER_INTERFACE, __RPC_FAR * PRPC_SERVER_INTERFACE;
Using the above structure as a reference, I adjusted the data types of each field in the interface defined within services.exe and arrived at the following result:
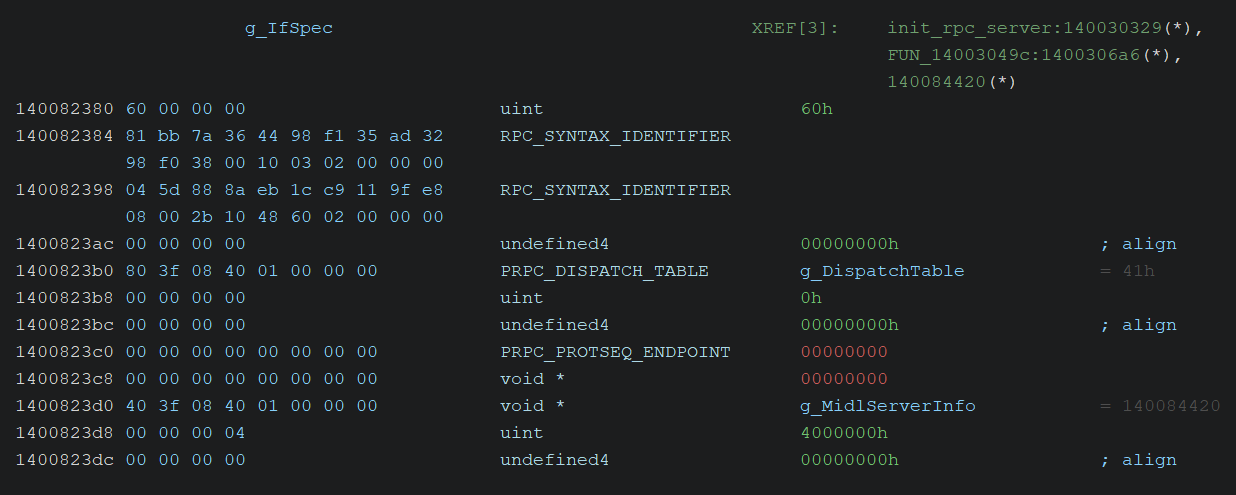
It contains a pointer to the RPC_DISPATCH_TABLE structure (referred to here as g_DispatchTable), which is defined as follows:
typedef struct {
    unsigned int          DispatchTableCount;
    RPC_DISPATCH_FUNCTION *DispatchTable;
    LONG_PTR              Reserved;
} RPC_DISPATCH_TABLE, *PRPC_DISPATCH_TABLE;
And when I inspected the structure, it appeared as follows:

This structure indicates that the second dispatch table pointer references 65 (0x41) functions.
When I followed the address of that second pointer and examined its contents, I found numerous entries pointing to NdrServerCall2, as shown below:
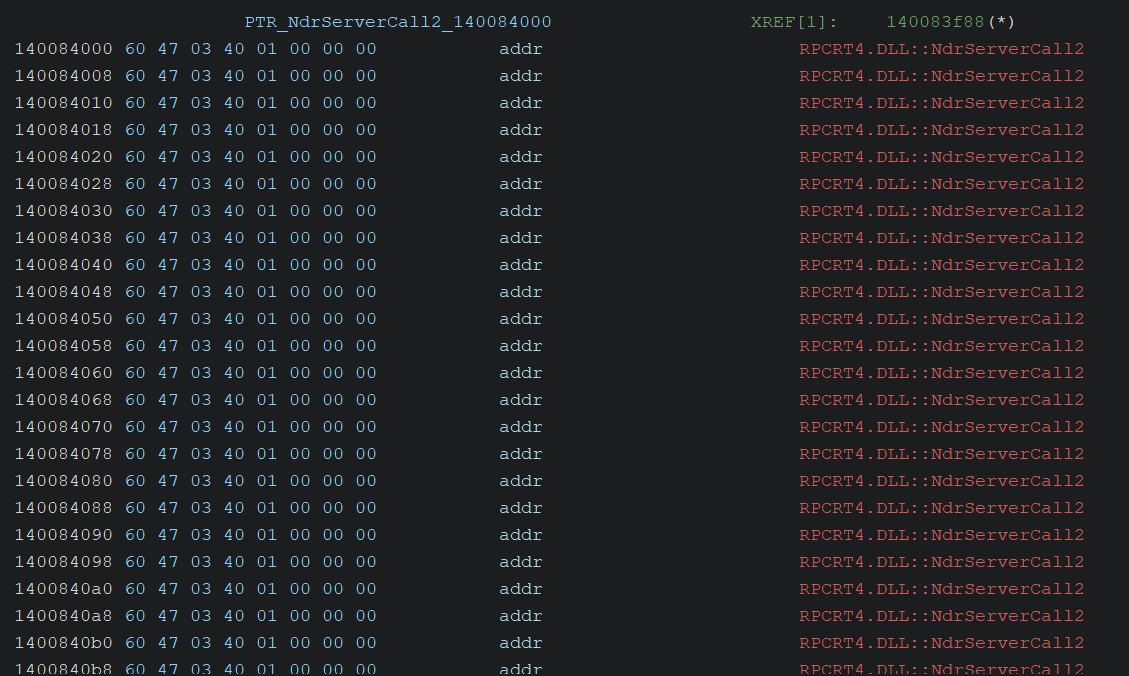
By the way, although it’s not shown in the image above, there was only one NdrAsyncServerCall entry in the latter half of the structure—everything else was NdrServerCall2. This indicates that, in most cases, NdrServerCall2 is invoked when the RPC server receives requests.
Further investigation showed that NdrServerCall2 calls a function from a function table, which is specified by the pointer in the DispatchTable field of the MIDL_SERVER_INFO structure.
Kernel Debugging on the services.exe Process
To investigate what happens after NdrServerCall2 is called, I performed kernel-mode debugging using WinDbg. However, as noted in this forum post, setting breakpoints inside functions within services.exe is challenging.
As shown below, I first find the services.exe process ID and set a breakpoint at a common function like nt!NtMapViewOfSection. Once that breakpoint was hit, I then set a breakpoint at RPCRT4!NdrServerCall2.
kd> !process 0 0 services.exe
PROCESS ffffd1819cda30c0
    SessionId: 0  Cid: 0230    Peb: d00724000  ParentCid: 01e0
    DirBase: 01c0b000  ObjectTable: ffffe38a1ec9c800  HandleCount: 651.
    Image: services.exe

kd> bp /p ffffd1819cda30c0 nt!NtMapViewOfSection

kd> g

kd> bp /p ffffd1819cda30c0 RPCRT4!NdrServerCall2

kd> g
Breakpoint 0 hit
nt!NtMapViewOfSection:
...Omitted...

kd> .process /r /p ffffd1819cda30c0

kd> bp /p ffffd1819cda30c0 RPCRT4!NdrServerCall2

kd> g
The first argument passed to NdrServerCall2 is a pointer to an RPC_MESSAGE structure. The contents of this structure are as follows:
typedef struct _RPC_MESSAGE {
    RPC_BINDING_HANDLE     Handle; // +0x0
    unsigned long          DataRepresentation; // +0x8
    void                   *Buffer; // +0xC
    unsigned int           BufferLength; // + 0x18
    unsigned int           ProcNum; // +0x1C
    PRPC_SYNTAX_IDENTIFIER TransferSyntax; // +0x20
    void                   *RpcInterfaceInformation;
    void                   *ReservedForRuntime;
    RPC_MGR_EPV            *ManagerEpv;
    void                   *ImportContext;
    unsigned long          RpcFlags;
} RPC_MESSAGE, *PRPC_MESSAGE;
Examining each field, I noticed that the fifth field was ProcNum, which I inferred likely corresponds to the index in the dispatch table mentioned earlier. This table includes functions such as ROpenSCManager, ROpenServiceW, and RStartServiceW.
After that, I continued debugging and found that the functions were called in the following overall order:
- RPCRT4!NdrServerCall2
- RPCRT4!NdrStubCall2
- RPCRT4!NdrStubCall2Heap
- RPCRT4!Invoke
- services!RStartServiceW
- services!ScStartServiceAndDependencies
- services!ScStartServicesInStartList
- services!ScStartMarkedServicesInServiceSet
- services!CServiceRecord::Start
- services!CDriverRecord::StartInternal
- ntdll!NtLoadDriver
- nt!KiSystemServiceCopyEnd
- nt!NtLoadDriver
- nt!IopLoadDriverImage
- nt!IopLoadUnloadDriver
- nt!IopLoadDriver
- nt!MmLoadSystemImage
- nt!MmLoadSystemImageEx
- nt!MiObtainSectionForDriver
- nt!MiCreateSectionForDriver
- nt!MiCreateSystemSection
- nt!MiCreateSection
- nt!MiCreateImageOrDataSection
- nt!MiShareExistingControlArea
- nt!MiValidateExistingImage
- nt!MiValidateSectionSigningPolicy
- nt!MiValidateSectionCreate
- nt!SeValidateImageHeader
Reference: Cybereason
How the Driver Signature is Verified
I discovered that the following processing occurs inside the nt!SeValidateImageHeader function:
kd> uf nt!SeValidateImageHeader
nt!SeValidateImageHeader:
fffff804`7b50f24c 488bc4          mov     rax,rsp
fffff804`7b50f24f 48895808        mov     qword ptr [rax+8],rbx
fffff804`7b50f253 48897010        mov     qword ptr [rax+10h],rsi
fffff804`7b50f257 57              push    rdi
fffff804`7b50f258 4881eca0000000  sub     rsp,0A0h
fffff804`7b50f25f 33f6            xor     esi,esi
fffff804`7b50f261 488bda          mov     rbx,rdx
fffff804`7b50f264 483935f5e65000  cmp     qword ptr [nt!SeCiCallbacks+0x20 (fffff804`7ba1d960)],rsi
fffff804`7b50f26b 488bf9          mov     rdi,rcx
fffff804`7b50f26e 488970f0        mov     qword ptr [rax-10h],rsi
fffff804`7b50f272 448bde          mov     r11d,esi
fffff804`7b50f275 8970e8          mov     dword ptr [rax-18h],esi
fffff804`7b50f278 0f84843b1200    je      nt!SeValidateImageHeader+0x123bb6 (fffff804`7b632e02)

...Omitted...

nt!SeValidateImageHeader+0x123bb6:
fffff804`7b632e02 bb280400c0      mov     ebx,0C0000428h
fffff804`7b632e07 e92cc5edff      jmp     nt!SeValidateImageHeader+0xec (fffff804`7b50f338)  Branch
The code 0xC0000428 corresponds to the error STATUS_INVALID_IMAGE_HASH, which is returned when digital signature verification fails.
cmp qword ptr [nt!SeCiCallbacks+0x20 (fffff804`7ba1d960)],rsiThe line above in nt!SeValidateImageHeader checks whether the callback function at nt!SeCiCallbacks+0x20 is NULL, and if so, returns 0xC0000428.
Next, I examined the data actually stored at nt!SeCiCallbacks+0x20.
kd> dq nt!SeCiCallbacks+0x20 L1
fffff804`7ba1d960  fffff804`7fe50680
Now, I disassembled the code at the address of the above data:
kd> uf fffff804`7fe50680
CI!CiValidateImageHeader:
...
Finally, I found that signature verification is performed by the CI!CiValidateImageHeader function. Broadly speaking, this function performs the following actions:
- Calls
CiInitializePhase2to carry out various initialization processes. - Calls
CipValidateFileHashandCipValidateImageHashto validate the file hash by extracting attributes from the signature embedded in the PE header and verifying the hash algorithm used.