Driver Signature Enforcement Internals

In the previous article, I analyzed how Windows verifies the digital signature of a kernel-mode driver when it is loaded as a service. In that article, I briefly mentioned the following command:
bcdedit /set nointegritychecks on; bcdedit /set testsigning onI also mentioned that running this command and then rebooting can bypass digital signature verification for kernel-mode drivers. In this article, I investigated which values are modified at the kernel level when the above command is executed.
There is some overlap with the previous article, but this time the focus is not on the signature verification process itself, but on the configuration toggles that control whether that verification is enforced.
Precautions:
- This research targets Windows 10.
- In some areas where the disassembled code was not fully understood, I have made informed assumptions. As a result, there may be some inaccuracies.
How BCDEdit Works Internally
The first thing I wanted to understand was what changes occur within Windows when the bcdedit /set command is executed. To investigate this, I began by reverse engineering bcdedit.exe.
Boot Configuration Data (BCD)
bcdedit operates on a database file called the Boot Configuration Data (BCD). Similar to the Registry, it first obtains a handle to the database file, then retrieves a key handle for the specified path, and finally reads or modifies the corresponding key-value pair. Unlike the Registry, however, the BCD file resides on the file system in UEFI-booted systems.
The BCD file is also referenced during system boot, and its stored settings are applied at that time. I will cover this in more detail in a later section.
Internal Workings of BCDEdit
1. Parsing Command-line Arguments
For example, when the bcdedit /set nointegritychecks on command is executed, the program first calls BcdEditParseCommandLine to parse the command-line arguments and initializes the global variable BcdEditParameterList, which stores each argument string, including “set”, “nointegritychecks”, and “on”.
To understand the structure of BcdEditParameterList, I used WinDbg to inspect it during execution.
I retrieved the contents of the global variable BcdEditParameterList immediately after the BcdEditParseCommandLine function was called, as shown below:
> dd bcdedit_exe!BcdEditParameterList
00007ff7`50d1f740  99b1c010 00000269 99b1c010 00000269
00007ff7`50d1f750  00000000 00000000 00000000 00000000
00007ff7`50d1f760  00000000 00000000 00000000 00000000
Based on the results above and analysis of the assembly code, I can determine that the BcdEditParameterList structure is a doubly linked list. At this stage, the first field contains a pointer to the next node, and the second field points to the previous node.
In this case, both the next and previous pointers refer to the same address, indicating that the parameter list contains only one element.
Next, I examined the contents of the address pointed to by the next (or previous) pointer and obtained the following results:
> dd 26999b1c010
00000269`99b1c010  50d1f740 00007ff7 50d1f740 00007ff7
00000269`99b1c020  99ca14aa 00000269 00000002 00000000
00000269`99b1c030  99ca14b2 00000269 99ca14d6 00000269
00000269`99b1c040  abababab abababab abababab abababab
00000269`99b1c050  00000000 00000000 00000000 00000000
I found that this structure also stores the addresses of each node in the order of Next pointer followed by Prev pointer. When I examined the data in the third field, I obtained the following result:
> du 26999ca14aa
00000269`99ca14aa  "set"
From this result, we can see that the third field contains the option (“set”) specified as a command-line argument.
The fourth field holds the value 2, which I infer represents the number of parameters that follow. For example, “nointegritychecks on” consists of two strings.
When I examined the fifth and sixth fields, I found that the strings were stored as follows:
> du 26999ca14b2
00000269`99ca14b2  "nointegritychecks"

> du 26999ca14d6
00000269`99ca14d6  "on"
In summary, I deduce that the structure of BcdEditParameterList is as follows:
typedef struct _BCD_EDIT_PARAMETER_LIST {
    struct _BCD_EDIT_PARAMETER_LIST* Next; // +0x00
    struct _BCD_EDIT_PARAMETER_LIST* Prev; // +0x08
    wchar_t* BaseString; // +0x10
    int Count; // +0x18
    wchar_t* Strings[]; // 0x20
} BCD_EDIT_PARAMETER_LIST;
2. /Set Operations
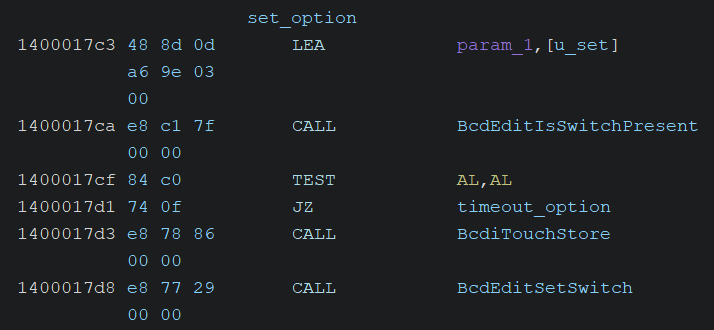
Next, the BcdEditIsSwitchPresent function is called to check whether the /set option is specified in the command-line arguments. If it is present, the BcdiTouchStore and BcdEditSetSwitch functions are called sequentially.
I analyzed the internal operations of each function and will describe them below.
3. Opening Store Handle & Getting Default/Current GUIDs
BcdiTouchStore is called. The function is simply a wrapper for BcdEditOpenStore.
Inside BcdEditOpenStore, it calls BcdOpenStore to retrieve a handle to the Boot Configuration Data (BCD) database. In UEFI boot, this data is retrieved from the EFI System Partition; in BIOS boot, it is retrieved from the Registry.
Next, it calls BcdiObtainActualIdentifier to obtain the default and current GUIDs for the key specified in the command-line arguments (e.g., “nointegritychecks” or “testsigning”).
4. Converting the Value to Boolean
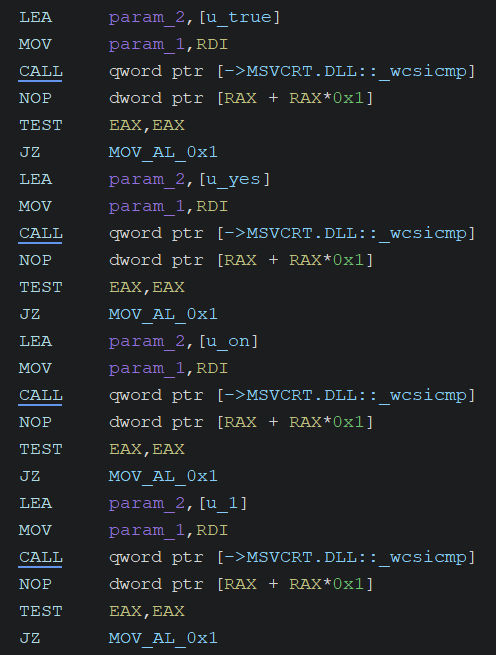
It performs the operation corresponding to the value of the specified key (e.g., “nointegritychecks”), converting the string “on” to a Boolean value (True). This process can flexibly convert not only “on” but also strings such as “true”, “yes”, and “1” to True (0x1), as shown below:
After that, it converts the value into the registry data format and sets it in the BCD database.
How Code Integrity Options are Loaded when System Boot
Next, I investigated how the contents of the Boot Configuration Data (BCD) are applied during system boot, and how the Code Integrity Options are passed to subsequent processes.
Using msinfo32, I confirmed that the boot mode of my Windows environment was UEFI, so I analyzed C:\Windows\Boot\EFI\bootmgfw.efi, the UEFI Boot Manager executable.
1. bootmgfw.efi: Getting a Specific BCD Option (nointegritychecks, testsigning)
First, bootmgfw.efi is executed by the UEFI firmware. During its initialization, it sets the boot directory path to \EFI\Microsoft\Boot internally using the BmFwInitializeBootDirectoryPath function.
Then, it calls BlGetBootOptionBoolean to retrieve a specific Boolean option from the boot option GUID list (a list of BL_BCD_OPTION structures) by the specified Type. (The list of Types is documented on Geoff Chappell’s website.) This function returns a pointer to the relevant BL_BCD_OPTION structure, from which the DataOffset field is accessed to obtain the Boolean value (True or False). The BL_BCD_OPTION structure is as follows:
typedef struct _BL_BCD_OPTION
{
    ULONG Type;             // +0x00
    ULONG DataOffset;       // +0x04
    ULONG DataSize;         // +0x08
    ULONG ListOffset;       // +0x0C
    ULONG NextEntryOffset;  // +0x10
    ULONG Empty;            // +0x14
} BL_BCD_OPTION, *PBL_BCD_OPTION;
Referring to the list of option types provided by Geoff Chappell, the types relevant to our investigation are:
- nointegritychecks:
0x16000048 - testsigning:
0x16000049
2. bootmgfw.efi: Operations for nointegritychecks
Using the above hexadecimal values, I searched for the code that processes “nointegritychecks” and identified the following sequence of operations:
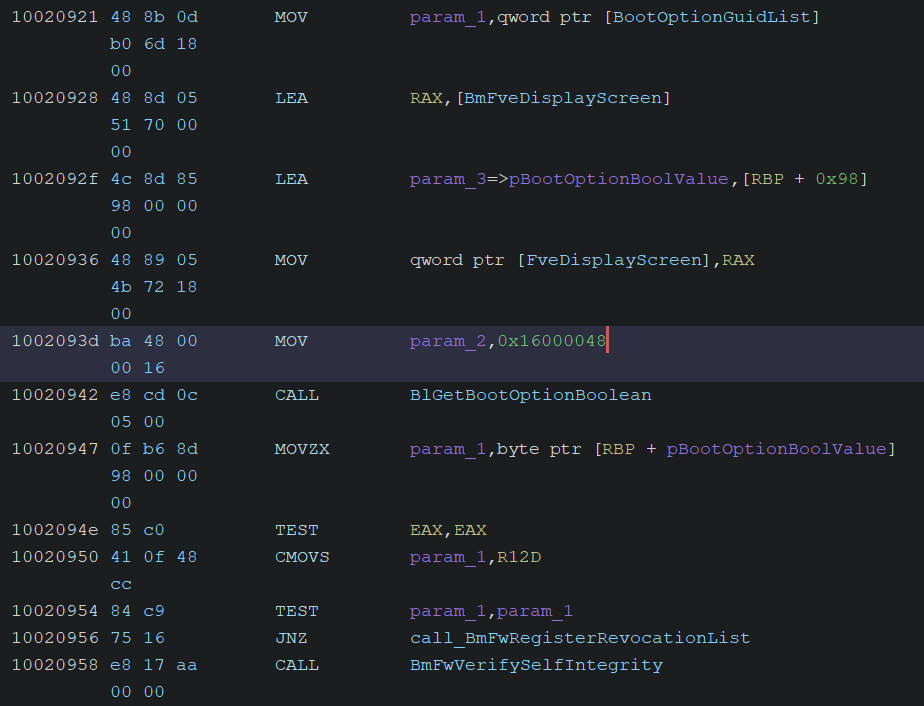
Examining the code in the screenshot above, we can see that it first calls BlGetBootOptionBoolean to retrieve the value of nointegritychecks. The option type is set to 0x16000048. If nointegritychecks is False (i.e., Off or No), it calls the BmFwVerifySelfIntegrity function to verify the signature of the Windows loader file—usually located at \Windows\system32\winload.efi (the path is obtained from the BCDEdit’s path option)—except under certain conditions, such as when the current device type is a CD-ROM. The signature verification itself is performed by the BlImgVerifySignedPeImageFileContents function.
So essentially, what’s happening here is that if nointegritychecks is disabled, the system immediately performs signature verification on the OS loader.
3. bootmgfw.efi: Launch winload.efi
The OS loader execution process is handled within the BmpLaunchBootEntry function. Within this function, the following sequence of actions is performed:
-
Calls
BmTransferExecution, which:- Calls
BlImgLoadBootApplication, which:- Calls
BlImgLoadPEImageEx, which:- Calls
ImgpLoadPEImageExto load the OS loader file from the path specified in the BCD option (typically\Windows\system32\winload.efi). It reads the contents of the loader file and maps it into memory.
- Calls
- Calls
- Calls
-
Calls
BlImgStartBootApplicationto transfer execution to the OS loader. At this point, the BCD options structure (PBL_LOADED_APPLICATION_ENTRY -> PBL_BCD_OPTION) loaded bybootmgfw.efiis passed towinload.efi.
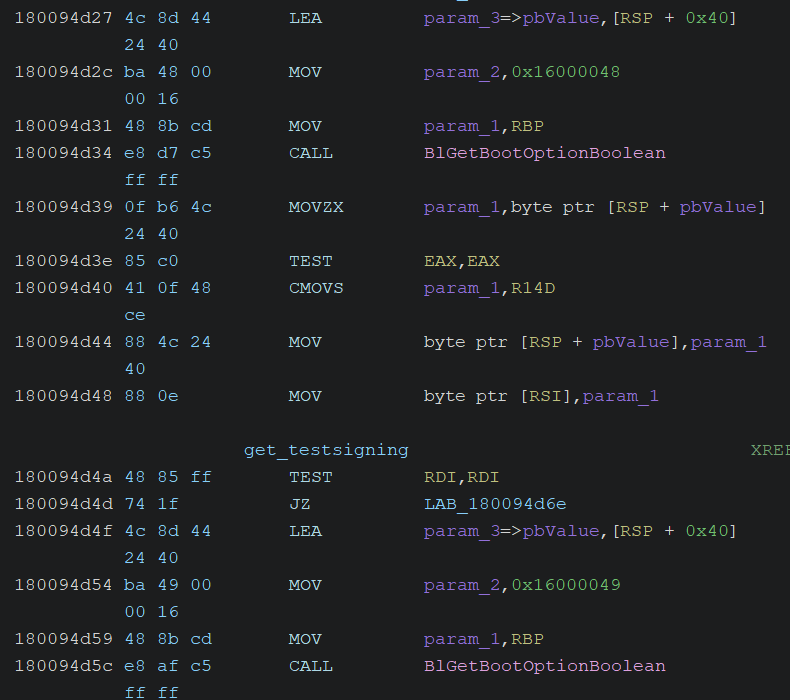
4. winload.efi: Getting BCD Options (nointegritychecks, testsigning)
Next, I analyzed winload.efi, the OS loader launched by bootmgfw.efi.
Within the OS loader, it retrieves the settings for the BCD options nointegritychecks, testsigning, and flightsigning by calling the BlImgQueryCodeIntegrityBootOptions function, as shown in the screenshot below:
5. winload.efi: Building the Code Integrity Options
The BlImgQueryCodeIntegrityBootOptions function is invoked from multiple locations, but it is particularly noteworthy that it is called from the OslpBuildCodeIntegrityOptions function.

OslpBuildCodeIntegrityOptions is likely responsible for configuring the underlying value of CI!g_CiOptions, which is the key variable used to determine whether driver signature verification should be enforced.
uint OslpBuildCodeIntegrityOptions(void)
{
  uint uVar1;
  uint uVar2;
  byte bNoIntegrityChecks [8];
  byte bTestSigning [8];
  byte bFlightSigning [16];

  BlImgQueryCodeIntegrityBootOptions(0x1801e79c0,bNoIntegrityChecks,bTestSigning,bFlightSigning );
  uVar2 = 0;
  if (bNoIntegrityChecks[0] == 0) {
    uVar2 = 6;
  }
  if (bTestSigning[0] != 0) {
    uVar2 = uVar2 | 8;
  }
  if (bFlightSigning[0] != 0) {
    uVar2 = uVar2 | 0x2000;
  }
  uVar1 = uVar2 | 0x20000;
  if (-1 < (int)BlImgWhqlSettings) {
    uVar1 = uVar2;
  }
  uVar2 = uVar1 | 0x100000;
  if ((BlImgWhqlSettings >> 0x1e & 1) == 0) {
    uVar2 = uVar1;
  }
  uVar1 = uVar2 | 0x400000;
  if ((BlImgWhqlSettings >> 0x1d & 1) == 0) {
    uVar1 = uVar2;
  }
  uVar2 = uVar1 | 0x40000;
  if ((BlImgWhqlSettings & 1) == 0) {
    uVar2 = uVar1;
  }
  uVar1 = uVar2 | 0x80000;
  if ((BlImgWhqlSettings >> 1 & 1) == 0) {
    uVar1 = uVar2;
  }
  return uVar1;
}
The code above is decompiled using Ghidra. It adjusts the Code Integrity Options bitmask based on the values of nointegritychecks, testsigning, flightsigning, and WHQL settings.
The resulting bitmask is then stored in the global variable OslLoaderBlock, which is the pointer to the LOADER_PARAMETER_BLOCK structure.
6. winload.efi: Launch ntoskrnl.exe
OslLoadImage is called to map the ntoskrnl.exe file into memory. It then calls the OslExecuteTransition function to prepare and initiate execution of the Windows kernel (ntoskrnl.exe).

As shown in the screenshot above, the following actions are performed:
OslFwpKernelSetupPhase1is called. In this function,EfiGetMemoryMapis called to obtain the memory map managed by the UEFI firmware. The map is then analyzed, bus master privileges are granted, and memory region initialization is performed.BlImgStartBootApplicationis called to launch the kernel boot application, transferring control to the kernel’s entry point along with theLoaderParameterBlock. More specifically, the application is started by invoking theImgFwStartBootApplicationfunction stored in theIapImageTable, which subsequently calls theImgArchEfiStartBootApplicationfunction.
How Windows Kernel Processes CI Options
From here, I will examine the disassembled code of ntoskrnl.exe to investigate how the Code Integrity Options, prepared during the earlier stages of the boot process, are utilized.
By tracing the functions called within the entry point of ntoskrnl.exe, I identified a sequence related to Code Integrity. Specifically, the functions are invoked in the following order:
- KiSystemStartup (entry)
- KiInitializeKernel
- InitBootProcessor
- SeInitSystem
- SepInitializationPhase1
- SepInitializeCodeIntegrity
For this part of the analysis, I found the article by j00ru to be particularly helpful.
KiSystemStartup (Entry Point)
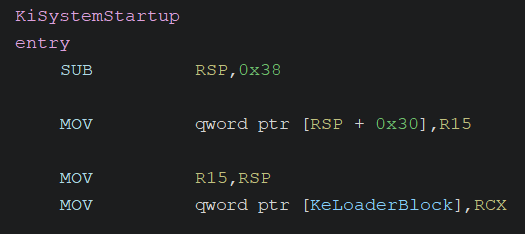
The KiSystemStartup function stores the pointer to the LOADER_PARAMETER_BLOCK structure, received as its first argument, into the exported variable KeLoaderBlock. This structure also contains the Code Integrity Options, which are the focus of this article. These options are subsequently loaded as CiOptions in later stages of the boot process.
Loading CiOptions & Initializing CI Modules
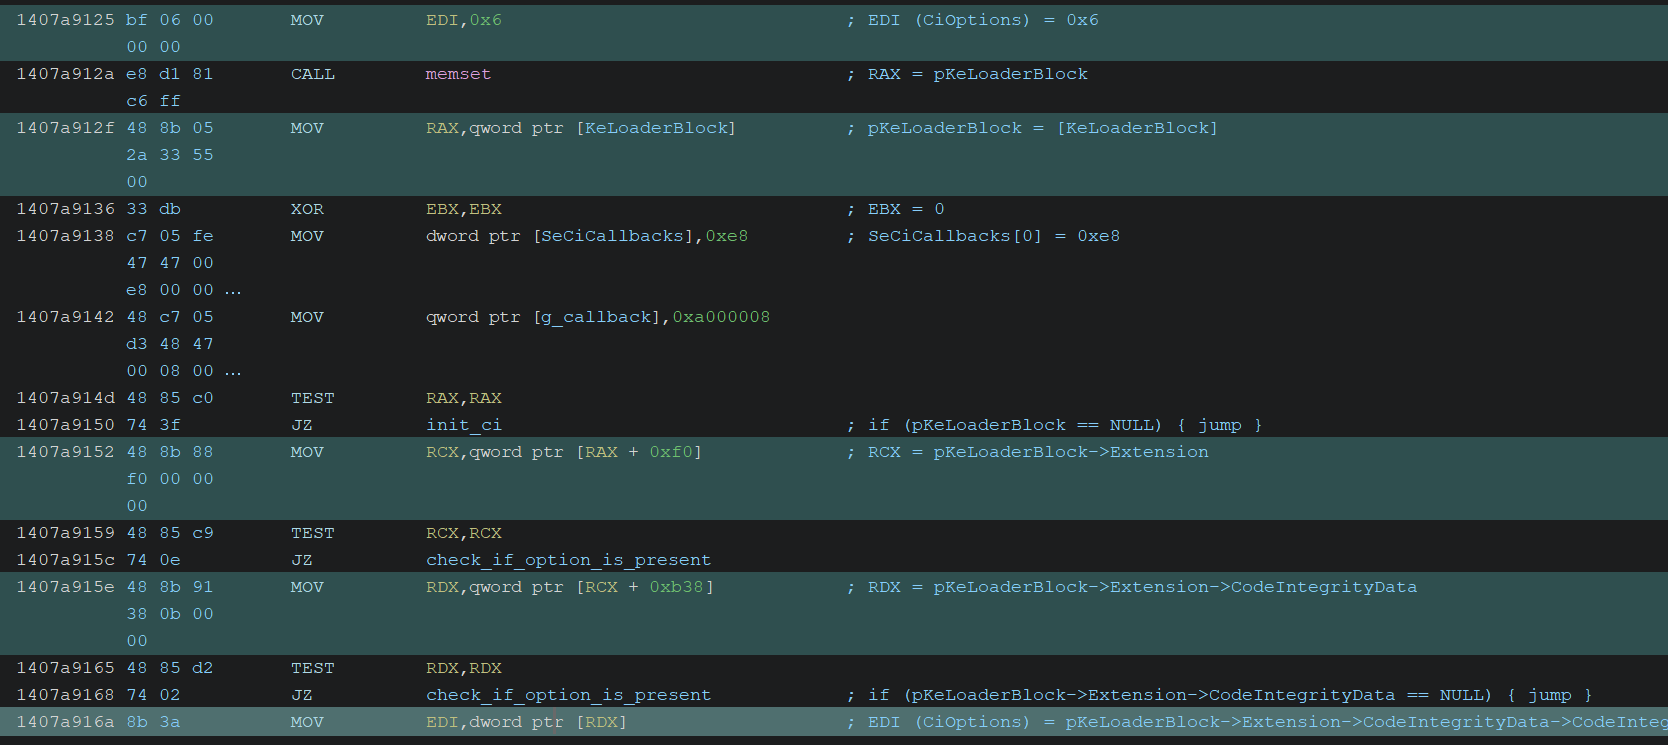
In the SepInitializeCodeIntegrity function, the CiOptions value is retrieved from the KeLoaderBlock->Extension->CodeIntegrityData->CodeIntegrityOptions field, as shown in the screenshot above.

After that, it appears to initialize the Code Integrity modules by calling CiInitialize, passing CiOptions as the first argument.
This completes the preparation and configuration of CiOptions within ntoskrnl.exe; the remaining processing is handled by ci.dll.
How g_CiOptions is Set
Next, I analyzed the inner workings of the CiInitialize function mentioned earlier. Since its first argument is CiOptions, I needed to understand how this value is processed internally.
The core processing of CiInitialize is performed by its internal function, CipInitialize, to which the arguments of CiInitialize are passed directly.
Examining the disassembled code of CipInitialize, it simply stores the CiOptions value into the global variable g_CiOptions, as shown in the screenshot below:
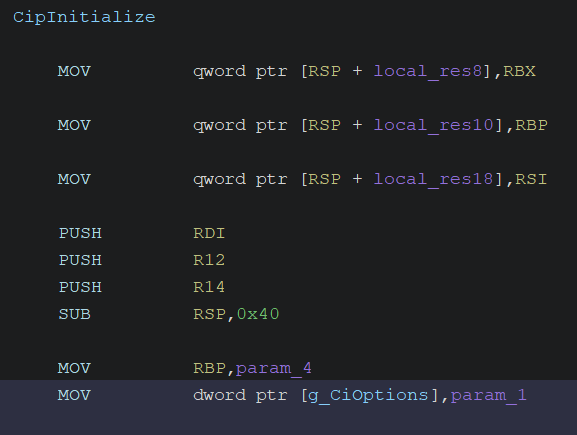
With this analysis, I finally understand the process leading up to the setting of g_CiOptions.
How g_CiOptions is Used
g_CiOptions is a global variable referenced when determining whether to perform driver signature verification.
As mentioned in the previous article, when starting a kernel driver service, the CiValidateImageHeader function is called to verify the driver’s signature. Before performing the verification, this function checks g_CiOptions to decide whether the signature check is necessary.
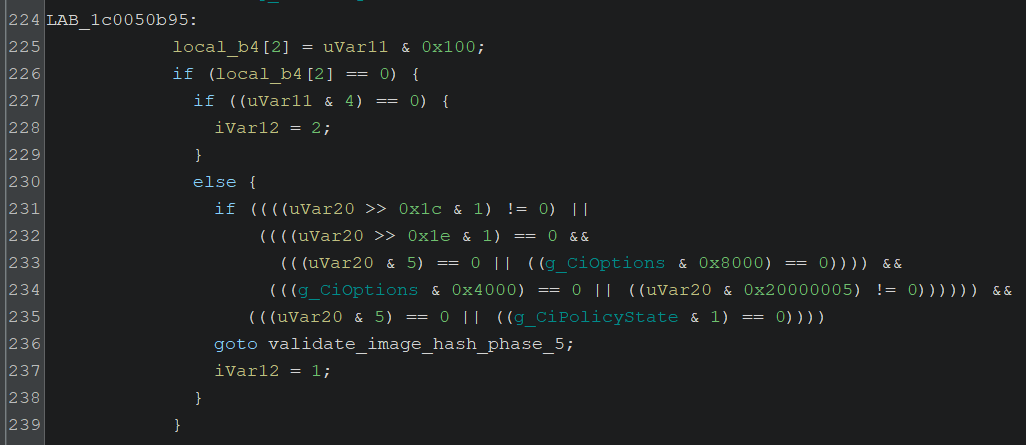
To be honest, this decision process was difficult to fully grasp, but from my rough understanding, it seems to work as follows:
- If the
0x8000flag is OFF, signature validation may be skipped depending on the image flags. - If the
0x4000flag is also OFF, the conditions for skipping validation become even more permissive. - If both flags are ON, validation is stricter and bypass is unlikely.
- If both flags are OFF, validation is likely bypassed (assuming other conditions are ignored).
DSE Bypass
By the way, Adam Chester’s article is very helpful for understanding DSE bypass techniques. According to the article, simply overwriting g_CiOptions to 0x0 will cause an error due to VBS (Virtualization Based Security).